Configuration
The FPL is very powerful, flexible, and can be configured in a variety of ways. This section covers all the various settings on the FPL.
Connecting
To change the configuration of the FPL a cell phone or other WiFi capable device connects to the FPL over WiFi. Once connected, the phone will be auto-forwarded to the configuration page using a captive portal. If auto-forwarding fails, users can access the configuration webpage from a browser using the http://rtk.local address.
To get into configuration mode, follow these steps:
- Power the device on. Hold the () power button for a few seconds. The FPL will beep and illuminate the display indicating it has turned on.
- From the main screen, press the (Fn) function button once to open the navigation menu.
- Press the (Fn) function button to navigate down until 'Config' is highlighted on the menu of the OLED display.

-
Press the () power button to select the menu item. The device should display the
SSID: RTK Config ######and the associated IP address. -
On your mobile device, connect to the WiFi network named
RTK Config-######. Upon connecting, your phone may warn you that the WiFi network is not connected to the internet. This is normal; stay connected and open a browser.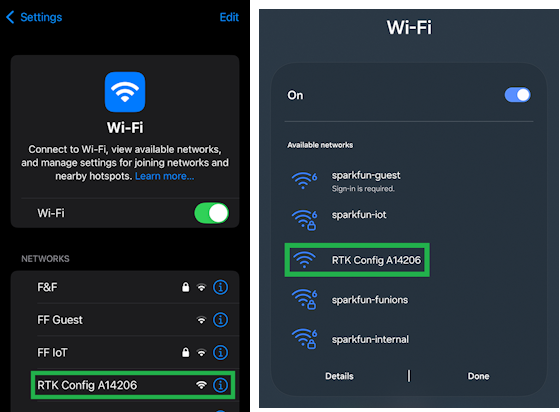
Selecting the WiFi network on iOS or Android warningIf you have problems, try disabling mobile/cellular data on your mobile device. The device or browser might be using the cellular connection for its internet access; however, we want to disable this setting to ensure that your mobile device remains on the WiFi access point for the browser.
-
Once the browser is opened, you should be automatically re-directed to the configuration webpage. If not, open a browser (Chrome is preferred) and type http://rtk.local into the address bar.
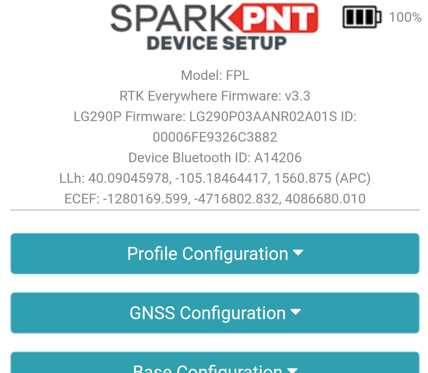
System Information
rtk.local webpageThe page heading shows a variety of information:
- Model - The model of the device
- RTK Everywhere Firmware - The main system firmware version
- LG290P Firmware - The GNSS receiver firmware version and its serial number
- Bluetooth ID - The MAC address broadcast during pairing
- LLh - The device's current position in Lat/Lon/Alt coordinates
- ECEF - The device's current position in geodetic coordinates
- Battery - The current battery level
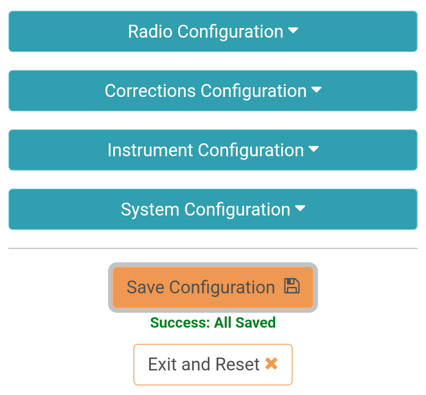
Save and Reset
After the desired settings have been changed, scroll to the bottom of the configuration page and click the Save Configuration button. A Success : All Saved message will confirm that settings have been saved. Once all settings have been modified, press the Exit and Reset button to reset the device using the new settings.
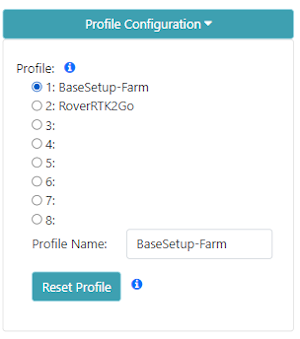
Profiles
The Profile Configuration menu is very powerful. Profiles are handy for saving multiple device configurations for various tasks and/or end-users. Users can store up to eight profiles, with user-specified names. Selecting a different profile will immediately load that profile's settings into the Web Config interface. Upon exit, the device will then use those new settings.
If a profile name is changed:
- Users must click the
Save Configurationbutton. - Once the
Success : All Savedmessage appears, the webpage needs to be reloaded.
Create or Rename Profile
Select a bullet, then enter a new name in Profile Name.
Scroll to the bottom of the configuration webpage and click the Save Configuration button. Once the Success : All Saved message appears, reload the webpage to update the configuration settings. With the webpage refreshed, open the Profile Configuration menu; the profile should be selected and named BaseSetup-Farm.
Configure a Profile
Once the profile has been loaded, changing the settings is straight forward.
- Select the bullet of the profile you'd like to configure.
- Under the
Profile Name:section of the menu, aLoading. Please wait...message will appear.
- Under the
- Once users have verified that the profile has loaded properly, scroll down to change any of its configuration settings.
After the desired settings have been changed, scroll to the bottom of the configuration page and click the Save Configuration button. Once the Success : All Saved message appears more changes can be made or Exit and Reset to use the new settings.
Reset a Profile
Users can reset a profile to the device's factory settings. Select the profile from the menu, then click on the Reset Profile button. A Resetting profile. message will appear briefly. Once it has vanished, scroll to the bottom of the configuration webpage and click the Save Configuration button. Once the Success : All Saved message appears, reload the webpage to update the configuration settings.
Profiles are shown on the display allowing a user to quickly change the device's settings with a few clicks of the front display buttons.
GNSS and Rover Settings
Users can change the settings for the GNSS receiver during rover operation. This includes the measurement rate, elevation mask, signal to noise ratio mask, constellations selection, PPP services and settings, NTRIP Client setup, and GNSS messages to report.

Measurement Rate
This is the number of fixes or location solutions reported by the receiver each second and includes all enabled messages. As this number increases, the amount of data that must be transmitted over the Bluetooth (or other) connection increases linearly. Increasing the measurement rate beyond 10Hz can lead to data loss if the connection is noisy.
Min SV Elevation
Minimum elevation in degrees for a GNSS satellite to be used in a fix.
Min C/N0
Minimum satellite signal level to be used in a fix.
Constellations
The receiver is capable of concurrently receiving signals from multiple satellites across multiple constellations. Some applications dictate the need to turn off certain constellation reception. Deselecting a given constellation will cause the receiver to ignore those signals preventing them from being used during position calculations. By default, all are enabled.
PPP Service
Use PPP corrections provided over the Galileo or BeiDou constellations. Once enabled, various settings are shown.
- Datum - Select the datum to be used during PPP convergence. WGS84, PPP Original, CGCS2000
- Timeout - PPP timeout before fallback. 90 to 180 seconds. Default: 120s
- Horizontal/Vertical Convergence - The required horizontal and vertical accuracy the solution must achieve before it is considered 'converged'.
MSM7 RTCM Selection
Use MSM7 format RTCM messages if enabled, MSM4 otherwise.
Min SV Elevation
Minimum elevation in degrees for a GNSS satellite to be used for RTCM corrections.
NTRIP Client
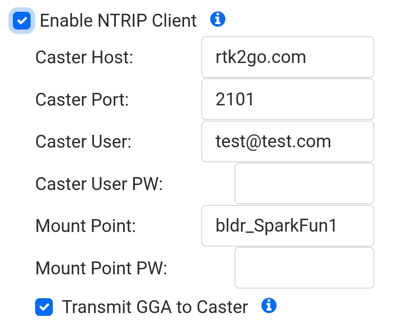
Use the internal NTRIP Client to download correction data from a casting service. The device must be provided with WiFi credentials and be within WiFi range at all times. Use this setting only if your GIS app doesn't have an NTRIP Client built-in.
Transmit GGA to Caster - Some casters require a regular position update from the rover (GGA message) so that the caster can automatically select the nearest available correction data.
Message Rates
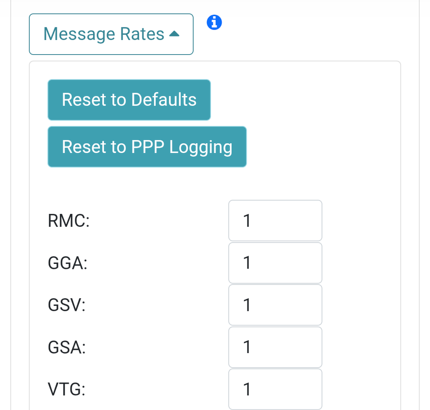
NMEA and RTCM are the two most commonly reported types of message but the GNSS receiver can output many additional messages. Each message rate controls which messages are disabled (0) and how often the message is reported (1 = one message reported per 1 fix, 5 = one report every 5 fixes).
Reset to Defaults will return all messages to the factory default rates. The default messages are a handful of NMEA messages (RMC, GGA, GSV, GSA, VTG, GLL, GST, etc.) and varies between models. RTCM can be enabled while the FPL is in Rover mode.
Reset to PPP Logging will set all messages to the required messages for post processing. This is commonly a handful of NMEA messages (RMC, GGA, GSV, GSA, VTG, GLL, GST, etc) as well as RTCM messages (1005, 107X, 108X, 109X, 111X, 112X, 113X, etc.) and varies between models. This mode is commonly used for logging during a Site Located Base when a static unit's location is processed to a very high accuracy for future use as a base.
Base Station
Users can configure the settings for operating as a base station. Additionally, users can enable the device to function as an NTRIP Server and and configure the RTCM messages that are reported while in Base mode.
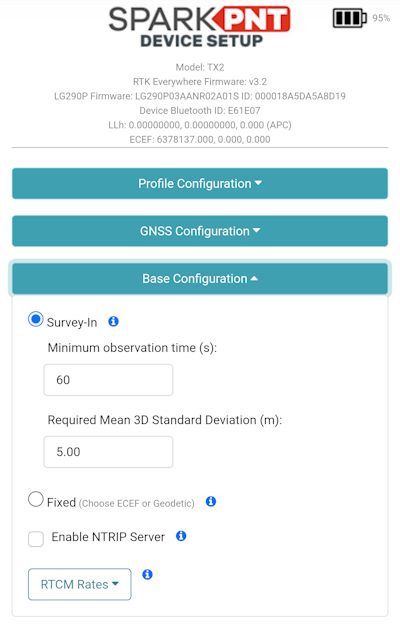
The base station's location can be provided with two methods, which affect the absolute-accuracy of its produced corrections:
- Survey-In: The base station configures its location, based on an average of measurements made over a specified time frame. This is used to provide corrections to a rover where the absolute-accuracy of the rover's position isn't necessary and relative-accuracy of its measurements are sufficient.
- For example, aerial surveys, mapping trails and campsites, or drafting construction plans where the accuracy of measurements in relation to one another (i.e. relative-accuracy) is important. However, the location of those positions, in relation the planet Earth (i.e. absolute-accuracy) is irrelevant.
- Fixed: Users can provide a fixed position for the base station's location in [ECEF] or [geodetic] coordinates. This is used to provide RTK corrections to rovers, for the most accurate surveying results in relation to fixed coordinates on the planet Earth.
- For example, surveying property lines, locating or installing utilities, or other applications where the accuracy of measured positions must be repeatable.
infoAny errors in the base station's location, are propagated directly into the rover through the RTK corrections. Therefore, if the base station is off by 2m in a specific direction; all the RTK measurements from a rover, using that base station, will also be off by 2m in the exact same direction.
Survey-In
If the precise location of a base station is not known it may be obtained by ‘surveying’ the location. The base is fixed in one place and takes approximately 60 seconds worth of readings to obtain a best fit location based on the measurements. This method achieves ~30cm accurate position but can vary. Increasing the Minimum Observation Time and/or Required Mean Deviation will increase accuracy but only to a point. Better accuracy is achieved with long-term logging and post processing. Default: 60s and 5.0m. Limits: 60 to 600s, 1.0 to 5.0m.
Fixed
If the location of the base is known it can be entered in either ECEF or Geodetic coordinates. In this mode the receiver will immediately begin outputting RTCM correction data. A fixed position is best obtained with PPP (please see our tutorial) or with post processing against a reference station. The location can be entered using ECEF or Geodetic coordinates. A list of commonly used coordinates can help a user quickly switch between known site 'markers'.
NTRIP Server
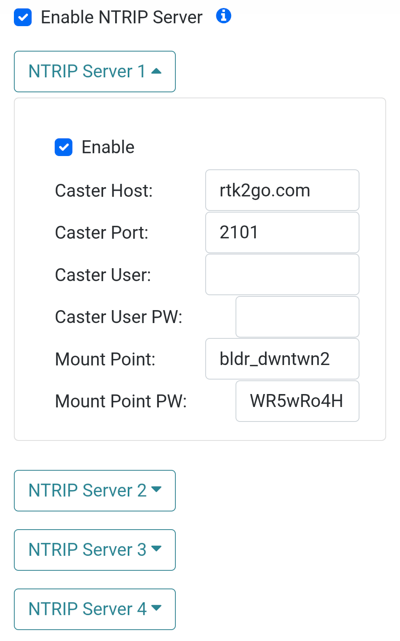
Enable up to four NTRIP Servers. Some Casters require a user and password, others require only a mount point and mount point password. RTK2Go and Emlid are two free-to-use casters.
Message Rates
Because a Base's purpose is to broadcast RTCM data, a separate set of RTCM message rates are used during Base mode. The GNSS receiver can output a variety of RTCM messages while in Base mode. Each message rate controls which messages are disabled (0) and how often the message is reported (1 = one message reported per 1 fix, 5 = one report every 5 fixes). While in Base mode:
- The FPL will only send the RTCM messages configured in this Base settings section and send them out over the enabled transport methods. It is not beneficial to send NMEA or other non-RTCM messages over the radio link (Bluetooth, TCP, LoRa, etc) so these messages are stripped out to reduce the link traffic.
- If a microSD card is inserted, the FPL will log the combined messages set in the Rover section as well as all the RTCM messages set in the Base RTCM settings. The RTCM messages in the Rover section are ignored. This is helpful if a base station needs to be post-processed for its location.
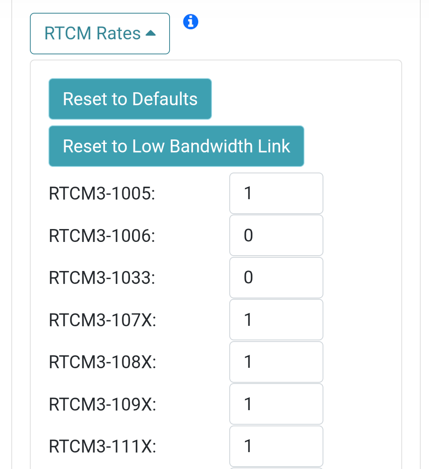
Reset to Defaults will return all messages to the factory default rates of one report every second. The default messages are a handful of RTCM messages (1005, 107X, 108X, 109X, 111X, 112X, 113X, etc.) and varies between models.
Reset to Low Bandwidth Link will set the factory RTCM messages rates to one report every 2 seconds (1005 is set to one report every 10 seconds). This mode is designed for radio links that have lower bandwidth. Because a Rover does not need corrections every second, this reduced transmission rate lightens the traffic on the transport link.
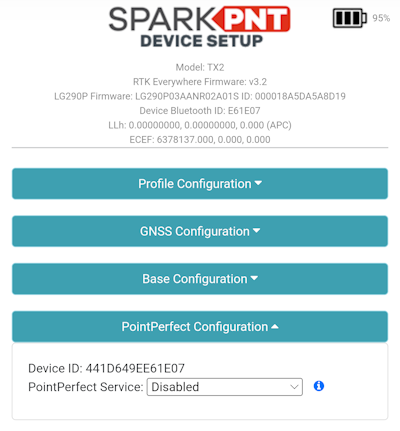
PointPerfect Service
This section is deprecated. Most users will register for the monthly $15/month PointPerfect service. Once registration is complete, the user is given NTRIP Credentials that will be entered directly into their GIS app. This section is maintained for users who use the older MQTT/IP service.
If users have a device that has been whitelisted for the MQTT/IP service, they can enable their Point Perfect service here.
Point Perfect Configuration menuPorts
The FPL can communicate over various external connections. This section controls type and settings for those interfaces.

Ports Configuration menuRadio Port Baud Rate
The FPL has a 4-pin locking JST connector located under the microSD cover that communicates over TTL serial. This RADIO port is connected directly to a UART on the GNSS receiver allowing output of NMEA or RTCM, and receiving RTCM corrections. This setting controls the communication baud rate.
Mux Channel
This is deprecated.
Data Port Baud Rate
The FPL has a 5-pin Lemo-compatible connector that communicates over RS232 serial. This setting controls the baud rate used for communication.
Enable External Radio Corrections
Enable this setting if an external packet radio is connected to the 4-pin JST RADIO connector. This configures the GNSS receiver to accept RTCM directly into its UART, circumventing the Corrections Priorities system.
Enable NMEA output on Radio
Enabling this setting introduces NMEA sentences into the data sent to the RADIO connector. For some setups, this is extra data that is not needed by the rover that can overwhelm low-bandwidth packet radios. By turning off NMEA, the radio can perform better because it has less data to transmit to the Rover.
Enable GNSS output over USB
If this setting is enabled, use +++ to exit this mode and re-open the serial menu system.
The USB-C connector primarily outputs status messages and allows serial configuration. Enabling this setting will send all GNSS output (generally NMEA but also RTCM) to the USB serial connection.
WiFi
WiFi Configuration menuNetworks
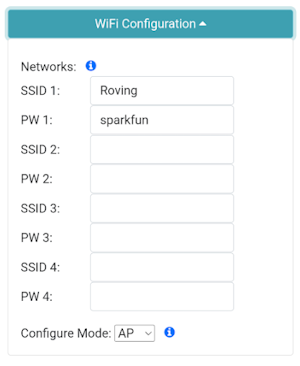
The WiFi menu allows a user to input credentials of up to four WiFi networks. WiFi is used for a variety of features on the RTK device. When WiFi is needed, the RTK device will attempt to connect to any network on the list of WiFi networks. For example, if you enter your home WiFi, work WiFi, and the WiFi for a mobile hotspot, the RTK device will automatically detect and connect to the network with the strongest signal.
Additionally, the device will continue to try to connect to WiFi if a connection is not successful. The connection timeout starts at 15 seconds and doubles with each failed attempt. For example, 15, 30, 60, etc seconds are delayed between each new WiFi connection attempt. Once a successful connection is made, the timeout is reset.
WiFi is used for the following features:
- NTRIP Client or Server
- TCP Client or Server
- Firmware Updates
- Device Configuration (WiFi Configure Mode only)
Configure Mode
When a user enters Config from the display menu, the device will start broadcasting a WiFi Access Point called RTK Config ######. If this setting is set to WiFi, the device will instead attempt to connect to one of the given local WiFi networks. The AP setting is best for in-field configuration. The WiFi setting is used when other services (such as NTRIP Client or TCP Server) need to connect to a local network or cellular hotspot for easier access.
AP: The device provides a WiFi access point for other devices to connect to it. This is useful for configuring the device in remote locations, where a WiFi network is not available.WiFi: The device access the WiFi networks configured in its settings. This is useful for connecting to a local WiFi network (including cellular hotspots) to configure settings and/or update the firmware.
The FPL is only compatible with 2.4GHz WiFi networks. It cannot connect to the higher speed 5GHz networks. On iOS devices, be sure to enable 'Maximize Compatibility' to allow 2.4GHz connections.
TCP/UDP
Most GIS apps use Bluetooth for collecting NMEA data from the FPL. In certain applications, it is preferred to connect to the FPL over TCP or UDP. This section focuses on the delivery of NMEA messages via TCP and UDP.
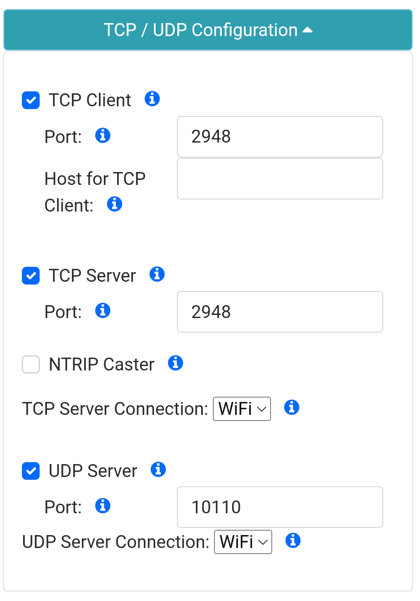
TCP/UDP Configuration menuTCP Client/Server
The RTK device supports connection over TCP. The TCP Client or Server operates over WiFi and sends position data to one or more clients. Some Data Collector software (such as Vespucci) require that the FPL connect as a TCP Client. Other software (such as QGIS) require that the FPL connect as a TCP Server. Both are supported.
If either Client or Server is enabled, a port can be designated. By default, the port is 2948 but any port 0 to 65535 is supported.
NTRIP Caster
When this setting is enabled, the device will turn on a TCP Server on port 2948. Any incoming requests made by an NTRIP Client will be accepted and responded to as if the FPL is an NTRIP Caster, including the transmission of a Mount table. This feature allows devices, such as a DJI drone controller, to connect to the FPL setup as a base, and receive corrections over NTRIP.
TCP Server Connection
TCP Server can connect over a local WiFi network connection, or by becoming an Access Point (hosting its own WiFi network). Use this option to select between the type of WiFi to use for TCP Server broadcasting. WiFi is customarily used when the FPL connects to a hotspot so that a GIS app can then obtain NMEA over TCP. AP is customarily used when a rover in the field (such as a DJI controller) needs TCP or NTRIP access in the field to a temporary base.
UDP Server
NMEA messages can be broadcast via UDP. If enabled, the UDP Server will begin broadcasting NMEA data and any enabled GNSS messages over the specific port (default 10110).
Radio Settings
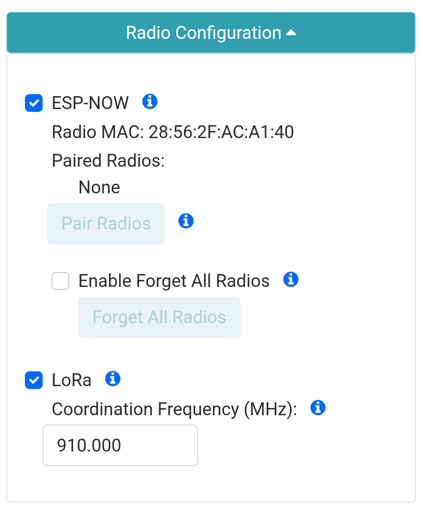
Radio Configuration menuESP-NOW
Enable ESP-NOW to allow device to device communication over 2.4GHz. See ESP-NOW for more information.
Enabling ESP-NOW has ramifications when using Bluetooth. Don't enable before reading the ESP-NOW section.
LoRa
Enable to allow a base station to transmit corrections over the internal 1W LoRa radio to rovers.
Enabling LoRa increases power consumption. Don't enable before reading the ESP-NOW section.
Coordination Frequency
The base and any listening rovers must use the same coordination frequency to communicate. The LoRa radio uses frequency hopping (FHSS) to be FCC compatible. Between transmissions, the base and rovers will return to this frequency to get their next frequencies to use. Modify this frequency if other equipment are causing interference.
Correction Priorities
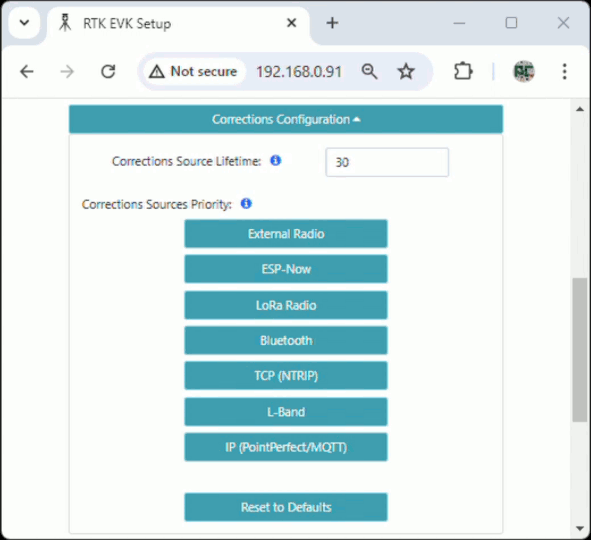
The FPL can receive corrections from multiple interfaces (Bluetooth, LoRa, WiFi, etc). In order to prevent the receiver from obtaining corrections from multiple sources and confusing the receiver, a type of 'air-traffic controller' is used. The Corrections Priorities menu allows a user to specify which correction source should be given priority. For example, if corrections are provided through ESP-NOW and an NTRIP Client simultaneously, the corrections from the NTRIP Client will be discarded because the ESP-NOW source has a higher priority. This prevents the RTK engine from receiving potentially mixed correction signals.
Below is the list of possible sources (not all platforms support all sources) and their default priorities. These generally follow the rule that a shorter distance between Rover and Base leads to more accurate, and therefore more valuable, correction data. Users can modify these priorities as they see fit, but the defaults are as follows:
- External Radio (100m OSR Baseline) - Two external high-power packet radios communicating directly between a Rover and Base.
- ESP-NOW (100m OSR Baseline) - Two RTK devices communicating directly between a Rover and Base over the built-in 2.4GHz radios.
- LoRa Radio (1km OSR Baseline) - Two RTK devices communicating directly between a Rover and Base over the built-in LoRa radios.
- Bluetooth (10+km OSR/SSR Baseline) - A Rover obtaining corrections over Bluetooth to a phone/tablet that has an NTRIP Client.
- USB (10+km OSR/SSR Baseline) - A Rover obtaining corrections over USB to a phone/tablet that has an NTRIP Client.
- TCP (NTRIP) (10+km OSR/SSR Baseline) - A Rover obtaining corrections over WiFi to a NTRIP Caster.
- PPP HAS/B2b (100km SSR Baseline) - A rover obtaining corrections from the E6/HAS or B2b signal.
- L-Band (100km SSR Baseline) - Not available on the FPL
- IP (PointPerfect/MQTT) (100+km SSR Baseline) - Not available on the FPL
The interface control is as follows:
- Clicking a source increases its priority
- Clicking the highest priority source makes it the lowest priority
- Clicking
Reset to Defaultswill restore the priorities to their default setting
Instrument
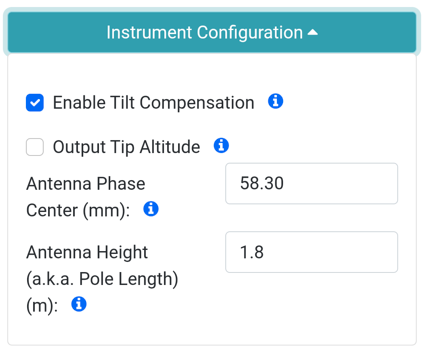
Instrument Configuration menuHere users can configure the APC (antenna phase center) and antenna height (pole length) for the combined instrument height value.
Enable Tilt Compensation
On models that incorporate a tilt sensor, tilt compensation will begin when the device has RTK Fix and is rocked back and forth to complete the calibration. The tilt sensor can be disabled if needed.
When the FPL is in tilt compensation mode, it must lower the altitude of the readings to where the point of the pole rests on the ground. If the APC or pole length are set incorrectly, the altitude and location readings during tilt compensation will be inaccurate. If your GIS app has an 'Instrument Height' setting, be sure to set the app setting to 0m while the FPL is in active tilt compensation.
Output Tip Altitude
By default, the FPL outputs the location of the spot slightly inside the dome where the GNSS signals are received. This spot is accurate to a few millimeters when an RTK Fix is achieved. The FPL's 'location' as seen in the GIS app is this spot hovering above the earth. The GIS app usually has a setting to input 'Instrument Height' which will subtract this altitude above the ground so that gathered points are points on the ground (not ~1.85m in the air). Enabling this setting will cause the FPL to subtract the APC + Pole Length from the GNSS altitude, and report the tip altitude to the GIS app. This setting is generally only used when a GIS app does not have an 'Instrument Height' setting.
APC
The Antenna Phase Center is the distance from the ARP (antenna reference point) on the bottom of the FPL to the point where GNSS signals are received. This value has been calibrated by the NGS and should not be modified in most instances.
Antenna Height
The antenna height is set by the user when extending the surveying pole. The measurement should be provided in meters, with the length of the surveying pole from its bottom tip to the ARP (antenna reference point) of the mounted device.
System Configuration
Users can access the devices system settings to upload new firmware, check and update the firmware through a WiFi network, configure its operating modes, the Bluetooth settings, buzzer, units of measurement, and factory reset.
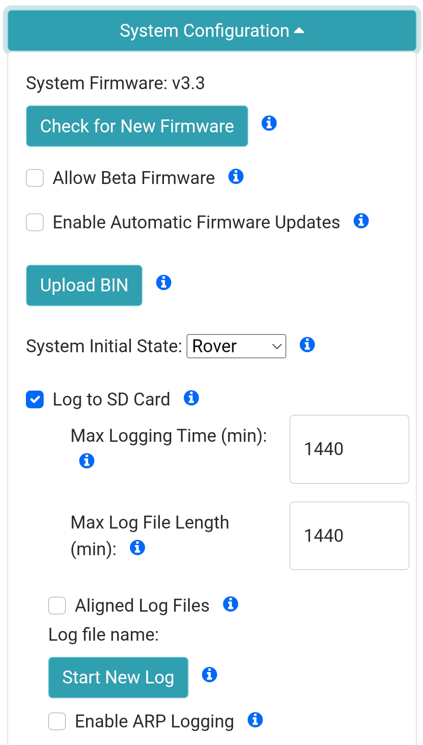
System Configuration menuCheck for New Firmware
Pressing this button will cause the unit to attempt to connect to WiFi and check for new versions of firmware. If new firmware is available, the button will change to Update to vX.Y.Z allowing the user to update the firmware.
Allow Beta Firmware
Enabling this setting will allow upgrades to firmware that is in development. Beta firmware should not be used in the field as it is not considered stable.
Enable Automatic Firmware Updates
If enabled, the unit will check for new firmware periodically for new firmware. This is useful if a device is deployed in a permanent environment where zero-administration is needed.
Upload BIN
If selected, the user will prompted to select a binary firmware file from their local system. The firmware will be uploaded and loaded onto the unit.
System Initial State
The FPL will enter this mode at boot.
Log to SD Card
If a microSD card is detected, the FPL will begin logging all GNSS messages including NMEA and any additionally enabled messages such as RTCM.
Once the max log time is achieved, logging will cease. This is useful for limiting long term, overnight, static surveys to a certain length of time.
Once the length of time is achieved, a new log will be created. This is useful for creating multiple logs over a long survey.
If Aligned Log Files is enabled, log files will be aligned to the Max Log File Length. Only possible if the Max Log Length is an integral fraction of 24 hours.
Log file name will show the current log file.
Start New Log will force the creation of a new log.
If Enable ARP Logging is enabled, the Antenna Reference Position from RTCM 1005/1006 will be added to the log.
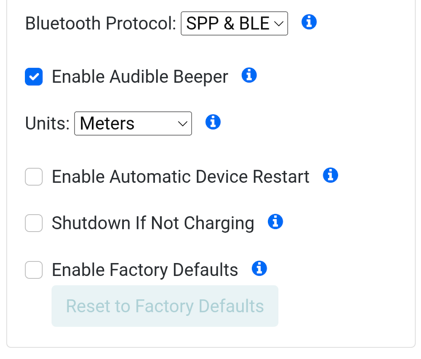
System Configuration menuBluetooth Protocol
The FPL will simultaneously broadcast over Classic Bluetooth (SPP) and Bluetooth Low Energy (BLE). If needed, the Bluetooth radio can be limited, or disabled.
Enable Audible Beeper
Allow internal buzzer to give audio feedback to the user.
Units
Display and print units in meters or feet. This does not affect NMEA output, only internal device prints and displays.
Enable Automatic Device Restart
If enabled, device will periodically restart. This is helpful when deploying a device in a remote location.
Shutdown If Not Charging
If enabled, device will turn off if no external charger is present. This is helpful when deploying in machinery or where a user may forget to turn the device off.
Factory Reset
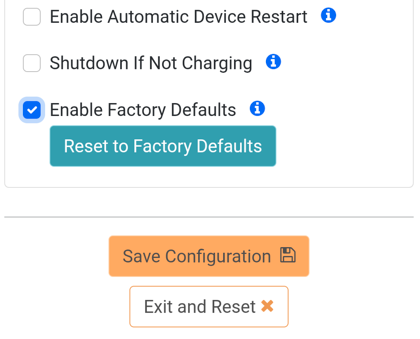
File Manager menuA Factory Reset will erase any user settings and reset the GNSS receiver to default settings. Any setting file associated with the current profile is removed, but logs on SD are maintained. To prevent accidental reset select the Enable Factory Default option, then click on the Reset to Factory Default button. A Defaults Applied. Please wait for device reset... message will appear next to the button. The Web Configuration interface will close and the device will beep once indicating it has reset.
File Manager
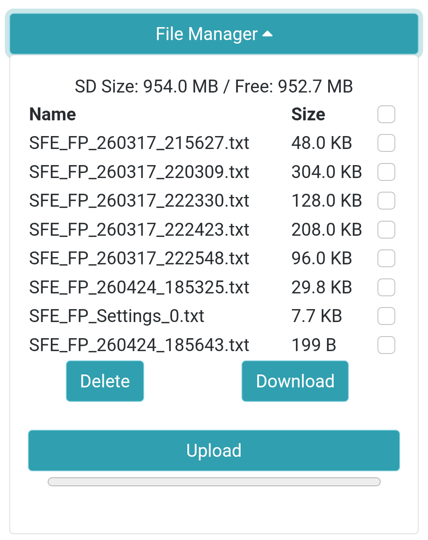
File Manager menuIf an SD card is detected, the contents will be shown in the File Manager section. Here, users can delete, download, and upload files as needed.