Operating Modes
The FPL will power on and enter either Rover or Base mode.
Rover
A Rover is the part of an RTK system that receives corrections from a Base. By default, the FPL will operate as a GNSS receiver that is expected to move, the Rover.
3D Fix
Within 30 seconds the FPL will gather the GNSS signals and begin outputting a location solution. The quality of this solution is generally 1 to 2 meters in accuracy. All GNSS receivers can achieve this level of fix.
RTK Float
High precision GNSS receivers have the unique capability to receive corrections from a base and enter RTK Float. This is usually for only a few seconds while the GNSS receiver resolves any ambiguities in the high-precision calculations.
RTK Fix
RTK Fix is the goal for most deployments. This mode is achieved when the GNSS receiver combines GNSS signals with corrections. Because the GNSS system is dynamic and the ionosphere experiences turbulence throughout the day, the FPL will need to be fed corrections over Bluetooth or WiFi every few seconds to maintain an RTK Fix. Corrections can be obtained through different interfaces. See Correction Sources for a list of different sources.
Base
A Base is the part of an RTK system that transmits corrections to a Rover. A Base does not move, and must know where it is in the world so that it can calculate the differences between the
Temporary Bases are generally setup for a short amount of time (a day or less) and require less up-front work than a permanent base, but generally have lower accuracy.
Survey-In Base
A Survey-In Base is the default mode for a device when it enters Base mode. The GNSS receiver will monitor its location for approximately 60 seconds. After 60 seconds, generally speaking, the readings are averaged together and that location result is used as the 'fixed' location. All rovers receiving the corrections from this base will be relatively very accurate, but the absolutely accuracy will be low. Said differently, if the Survey-In result is incorrectly 0.7 meters to the west, all rover locations will be 0.7m +/-10mm to the west.
Once the survey-in is complete, the FPL will begin outputting RTCM correction data. The RTCM can be transported over a variety of different methods including NTRIP Server, LoRa, ESP-NOW, serial, etc. See Transport methods for more information.
Augmented Survey-In Base
An Augmented Survey-In Base is where a temporary base is set up to Survey-In its location but is simultaneously provided RTCM corrections so that its Survey-In is done with very precise readings. An augmented base running a Survey-In removes much of the relative inaccuracies from a Rover-Base system. We've found an Augmented Base varies as little as 50mm RMS between intra-day tests, with accuracy within 65mm of a PPP of the same location, same day.
To set up an augmented base the RTK device should be located in a good reception area and provided with RTCM corrections. Let it obtain RTK Fix from a fixed position (on a tripod, for example) in Rover mode. Once an RTK fix is achieved, change the device to temporary Base mode (also called Survey-In). The device will take 60 seconds of positional readings, at which point the fixed position of the base will be set using RTK augmented coordinates. At this point, corrections provided to the base can be discontinued. The Base will begin outputting very accurate RTCM corrections that can be relayed to a rover that is in a less optimal reception setting.
Similarly, a PPP service such as Galileo HAS or BeiDou B2b can be used to increase the accuracy during the Survey-In. The RTK device should be located in a good reception area and allowed to reach PPP convergence (10+ minutes). Once converge, change the device to temporary Base mode (also called Survey-In). The device will take 60 seconds of positional readings, at which point the fixed position of the base will be set using PPP augmented coordinates. The Base will begin outputting very accurate RTCM corrections that can be relayed to a rover that is in a less optimal reception setting.
Site Located Base
A site located temporary base is when a RTK device is deployed over a position, commonly a stake in the ground, each day that work needs to get done, then the equipment is removed to prevent theft or abuse. A site located base has nearly the accuracy of a permanent base, but requires a one-time investment of a few hours of work to configure.
The first step is to log raw GNSS data for a few hours, then submit it to a processing service to remove as many ambiguities and increase the location accuracy as much possible. With a few hours of logging, location accuracies can be better than 10mm. Once the staked location is known, a base can be quickly redeployed over that known spot during future site visits. The benefit of this longer, logged site survey over a 'Survey-In' style base is the increase in absolute accuracy.
Each day that work needs to be done, the RTK device should be carefully located over the stake or monument with the known coordinates. The RTK device is configured to operate in 'Fixed Base' mode with the coordinates reported by the PPP service, and the base will immediately begin transmitting corrections over whatever transport methods are enable: for example, NTRIP Server, ESP-NOW, LoRa, WiFi AP, etc. Any rover receiving corrections from this type of base will be both relatively and absolutely accurate with the accuracy reported in PPP service report.
How to Complete a Site Located Base
Any of the SparkPNT products can be used to do a site located base. For products that have a microSD interface, the raw satellite data is recorded to the log file. For products that don't have a microSD interface, the device must be connected over USB to an external device capable of logging - this is most often a laptop or tablet.

Above, the Messages Menu, shown on the RTK Postcard, allow PPP logging to be enabled.

Above, the RTK Postcard displays the 'P' logging icon indicating raw signals are being logged.
For the RTK Postcard and RTK EVK, raw logging must be enabled and a microSD card inserted. Once enabled, the logging icon should show a 'P'.
For the RTK Torch, raw logging must be enabled, then the USB port must be configured for GNSS output. Once complete, you will see a stream of NMEA sentences in readable characters, as well as a mix of non-readable binary characters.
For the RTK Facet mosaic, a RINEX output stream must be created and a microSD card inserted.
Logging of data should run for as many hours as is possible. 4 hours is generally considered a minimum, with diminishing returns after 12 hours. The PPP service report will include an estimate of the inaccuracy so if greater accuracy is needed, a longer survey can be re-run.
Once a log of raw GNSS data is obtained, it needs to be processed with RTKCONV.
Note: RTK Facet mosaic users can skip the following RTKCONV step because a RINEX file was directly recorded and can be used with most post processing services.
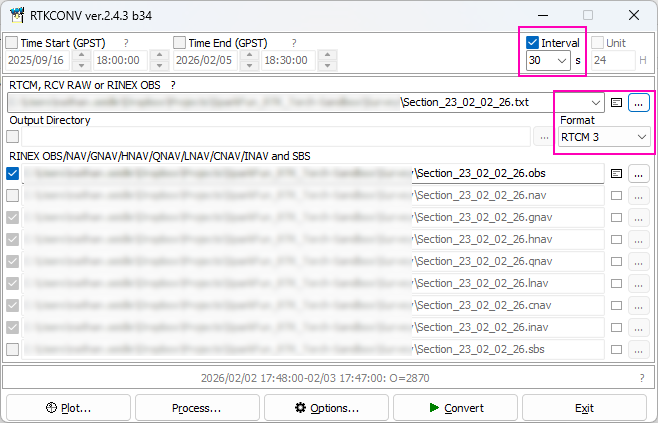
We must convert the RTCM contained in the log files to RINEX data the post processing services understand. Download RTKLIB. As of writing, this was v2.4.3. RTKLIB is a collection of tools commonly used to manipulate raw GNSS data. Navigate to the bin folder and open RTKCONV. Select the log file that needs to be converted to RINEX. In the above example, the text file is RTCM 3 format, and we enabled 30 second intervals. This decimation process is important: it selects a reading every 30 seconds, removing any extra readings in between. Most PPP services automatically decimate to 30 seconds so this will not result in accuracy loss but will significantly reduce your file sizes allowing much faster processing.
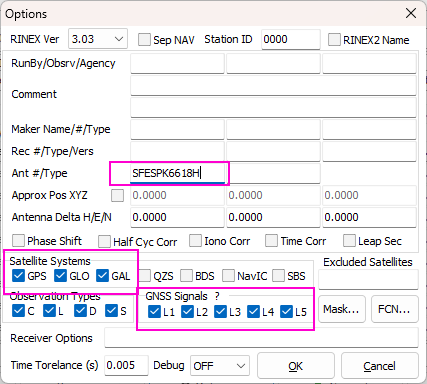
Above, press the Options button and be sure all GNSS signals are enabled and the GPS, GLO, and GAL constellations are selected. Not all PPP services can use this extra data but it's better to have recorded them. If you used a SparkFun SPK6618H (antenna code SFESPK6618H) or TOP106 antenna (antenna code SFETOP106), you can include an antenna code for additional ambiguity resolution.
Press convert.
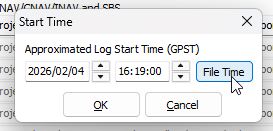
When the Start Time window opens, press the File Time button and then OK.

Once complete, an OBS file should be output. Zip the OBS file with the ZIP tool of your choice.
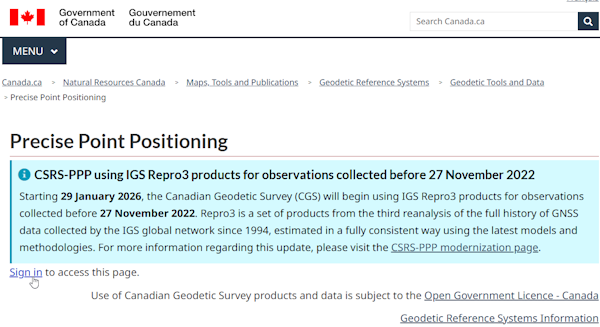
Log in to CSRS.

Enter your email address and select ITRF as the Processing Mode. Upload the ZIP file of the OBS. Processing can take a few minutes up to a few hours.

Above, we see the location as well as the accuracy estimate of 4mm, 3mm, and 14mm of the lat/lon/alt. When work needs to be done at the site, the RTK device is set on the known location, then configured as a 'Fixed Base' with the PPP location coordinates.
Fixed Base
Permanent Bases are the gold-standard for accuracy. They require extra work to set up, but can used for years with proper maintenance.
In Fixed mode, the coordinates of the antenna must be known with great accuracy and need to be entered into the FPL. These can be entered in ECEF or Geographic coordinates. Once the device has been configured, a user enters Base mode by changing the mode in configuration or through the display menu. Once base mode begins, the FPL will immediately begin outputting RTCM correction data. The RTCM can be transported over a variety of different methods including NTRIP Server, LoRa, ESP-NOW, serial, etc. See Transport methods for more information.
Base Cast

Base Cast mode enables the following settings:
- Enables Base mode
- Enables NTRIP Caster mode
- Enables TCP on port 2101
- Enables WiFi AP mode on IP 192.168.4.1
This is helpful when using the FPL in conjunction with a drone controller that expects connectivity to a near by Base over WiFi. All of these settings can be set manually; Base Cast mode just provides a quick and easy way to put the FPL into the default mode compatible with most drone controllers.
This mode can be entered from the System Menu, using the display menu, or by setting the System Initial State to BaseCast in configuration mode.
Base Assist

Base Assist mode is used to force the FPL to use its immediate location as the fixed location base setup. Said differently, while in Rover mode, if this mode is selected, the FPL will copy its current location and begin a fixed base with the current location. The benefit to an Assisted Base is that it allows a base to be established very quickly on site and all the Rover to be relatively accurate to the base. If you are staking out the relative locations of plants, trees, buildings, etc this mode allows the relative distances and locations of those points to be accurate to around 10mm. However, because the base location was not found with great accuracy, those locations will all be off from the absolute global accuracy.