Quickstart
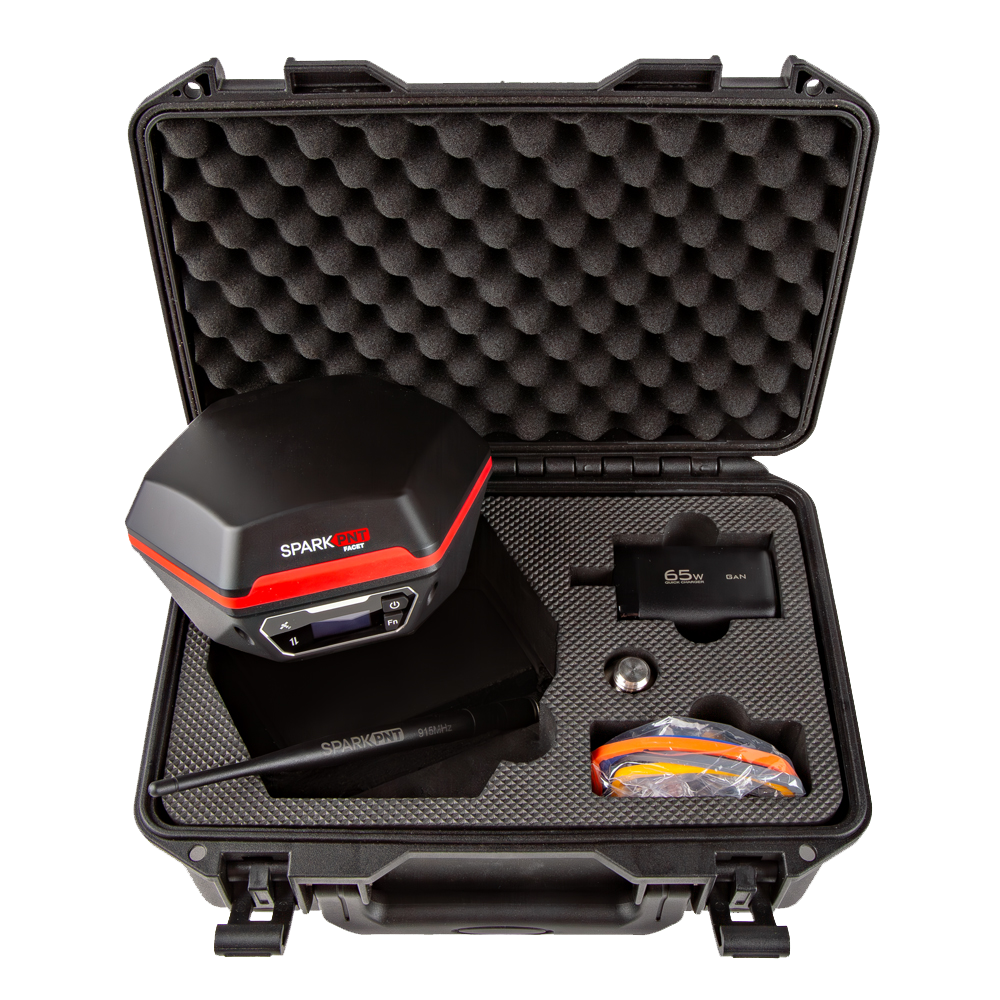
This quick start guide will get you started in 10 minutes or less. For the full product manual, please proceed to the Equipment Overview.
For the purposes of this quickstart, you will only need a standard surveying pole, or camera monopod. No other parts (LoRa antenna, USB cable, etc.) are needed.
Android
- Download SW Maps. This may not be the GIS software you intend to do your data collection, but SW Maps is free and makes sure everything is working correctly out of the box.
-
Attach the FPL to a 5/8" 11-TPI standard surveying pole or to a monopole using the included thread adapter.
-
Turn on the FPL by pressing the Power button for 3 to 4 seconds until the display illuminates.
-
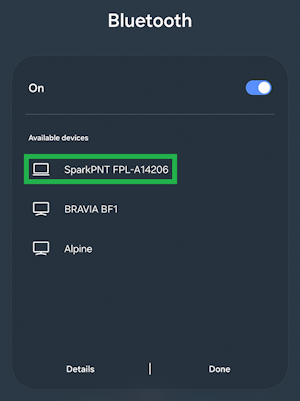
From your cell phone, open Bluetooth settings and add a new device. You will see a list of available Bluetooth devices. Select the SparkPNT FPL-###### where the ## are the last 6 characters of the unique ID printed on the side of the device.
-
Once paired, open SW Maps. Select ‘New Project’ and give your project a name like RTK Project.
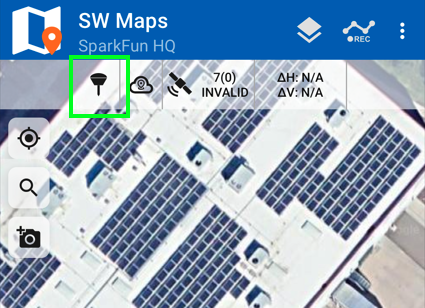
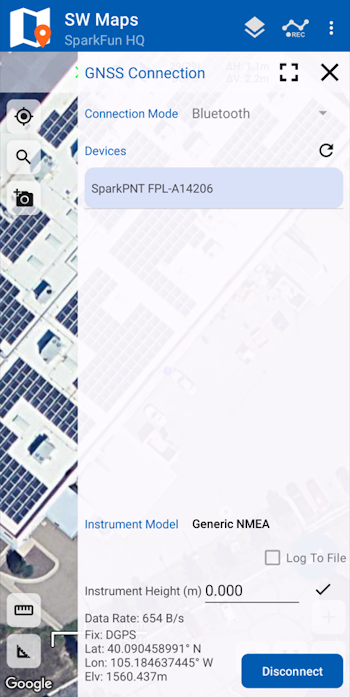
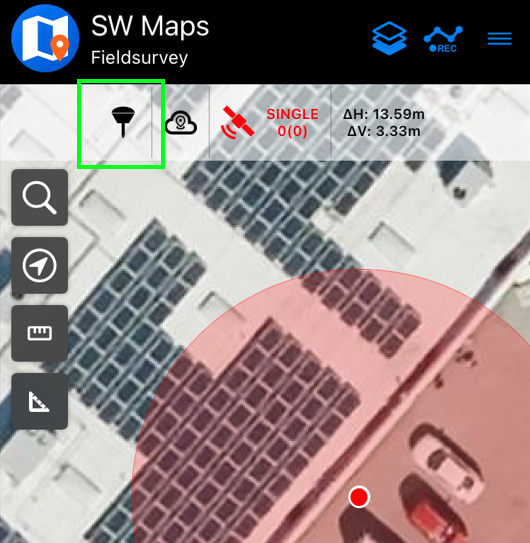
- Press the GNSS receiver icon located next to the cloud icon in the top bar. You should see the SparkPNT FPL-###### in the list of Bluetooth devices. Select it. Confirm that the Instrument Model is Generic NMEA, then press the
Connectbutton in the bottom right corner. SW Maps will show a warning that the instrument height is 0m. That’s ok.

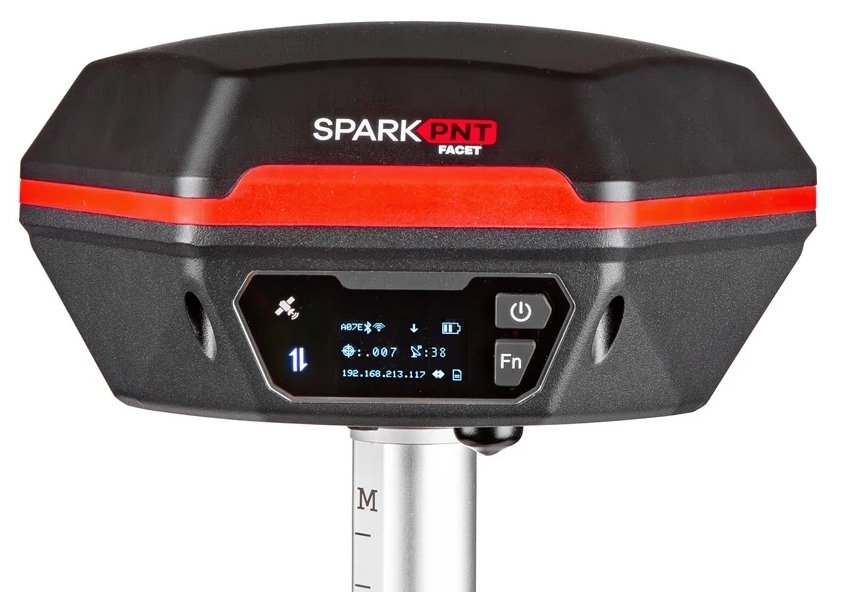
- Once connected, you should see the Bluetooth icon appear on the FPL's display. Below is a breakdown of the common icons:
- A142 - Bluetooth MAC address used during pairing to identify the device. This is also printed on the side of the device as part of the Device ID.
- Bluetooth Symbol - A remote device is currently connected to the FPL over Bluetooth.
- Down Arrow - Correction data is detected. This is a good indicator that RTCM is correctly being received.
- Battery Gauge - Relative level of battery capacity remaining from 100% (three bars) to nearly exhausted (no bars).
- Double Cross-Hair - Estimated horizontal positional accuracy of the device in meters. A solid double cross hair icon indicates an RTK Fix.
- Satellite Dish - Satellites in view. Used as a general indicator of how well the device is receiving GNSS signals. This varies between 20 to 40 satellites. A satellite dish with a 'P' indicates PPP reception is enabled.
- Bluetooth Symbol in Lower Right Corner - Corrections can come from a variety of sources. This icon indicates the corrections being used by the GNSS receiver. In this case, corrections over Bluetooth are being used.
- Document - This animated icon indicates when data is being logged to microSD.
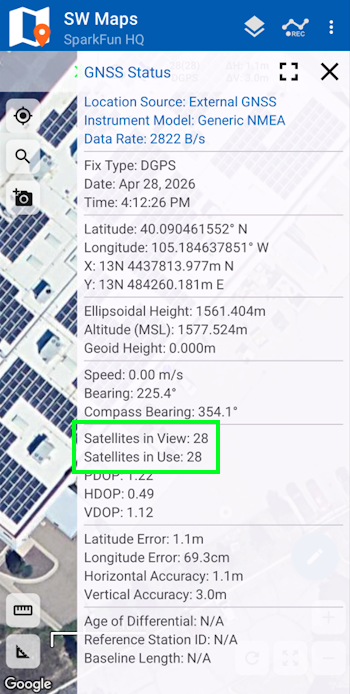
- Now put the device outside with a clear view of the sky. GNSS doesn’t work indoors or near windows. Press the SW Maps icon in the top left corner of the home screen and select GNSS Status. Within about 30 seconds you should see 10 or more satellites in view (SIV) (see above). More SIV is better. We regularly see 30 or more SIV. The horizontal positional accuracy (HPA) will start at around 10 meters and begin to decrease. The lower the HPA the more accurate your position. This accuracy should be below 1m in normal mode.
Press the target icon in the top-left corner of the map to view your position.
You can now use your FPL to measure points with meter accuracy. If you need extreme accuracy (down to 8mm) continue reading the Corrections section.
iOS
- Download SW Maps for iOS. This may not be the GIS software you intend to do your data collection, but SW Maps is free and makes sure everything is working correctly out of the box.
-
Attach the FPL to a 5/8" 11-TPI standard surveying pole or to a monopole using the included 5/8" to 1/4" thread adapter if needed.
-
Turn on the FPL by pressing the () power button for 3 to 4 seconds until the display illuminates.
-
Open SW Maps. Select ‘New Project’ and give your project a name like ‘RTK Project’.
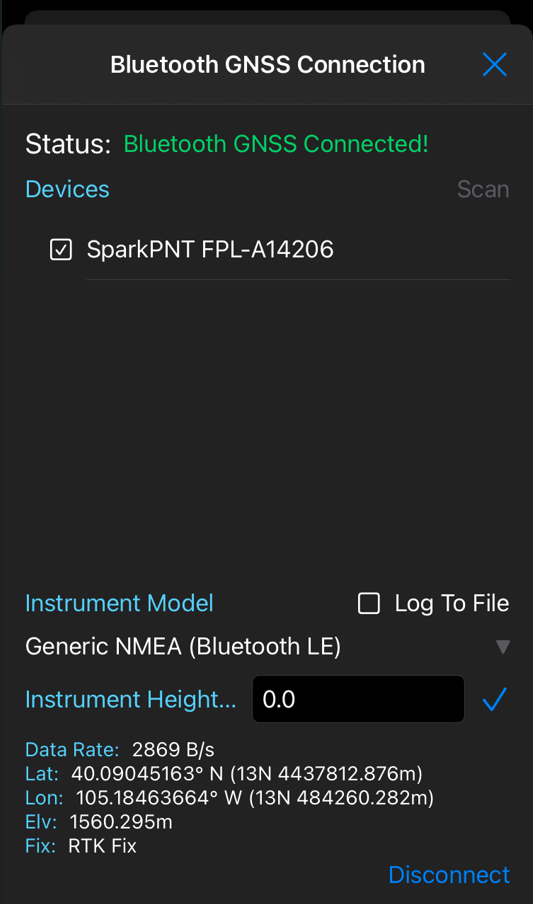
- Press the GNSS receiver icon located next to the cloud icon in the top bar. You will need to agree to allow a Bluetooth connection. Set the Instrument Model to Generic NMEA (Bluetooth LE). Press Scan and you should see the SparkPNT FPL-###### in the list of Bluetooth devices. Select it then press the ‘Connect’ button in the bottom right corner.
- Once connected, you should see the Bluetooth icon appear on the FPL's display. Below is a breakdown of the common icons:
- A142 - Bluetooth MAC address used during pairing to identify the device. This is also printed on the side of the device as part of the Device ID.
- Bluetooth Symbol - A remote device is currently connected to the FPL over Bluetooth.
- Down Arrow - Correction data is detected. This is a good indicator that RTCM is correctly being received.
- Battery Gauge - Relative level of battery capacity remaining from 100% (three bars) to nearly exhausted (no bars).
- Double Cross-Hair - Estimated horizontal positional accuracy of the device in meters. A solid double cross hair icon indicates an RTK Fix.
- Satellite Dish - Satellites in view. Used as a general indicator of how well the device is receiving GNSS signals. This varies between 20 to 40 satellites. A satellite dish with a 'P' indicates PPP reception is enabled.
- Bluetooth Symbol in Lower Right Corner - Corrections can come from a variety of sources. This icon indicates the corrections being used by the GNSS receiver. In this case, corrections over Bluetooth are being used.
- Document - This animated icon indicates when data is being logged to microSD.
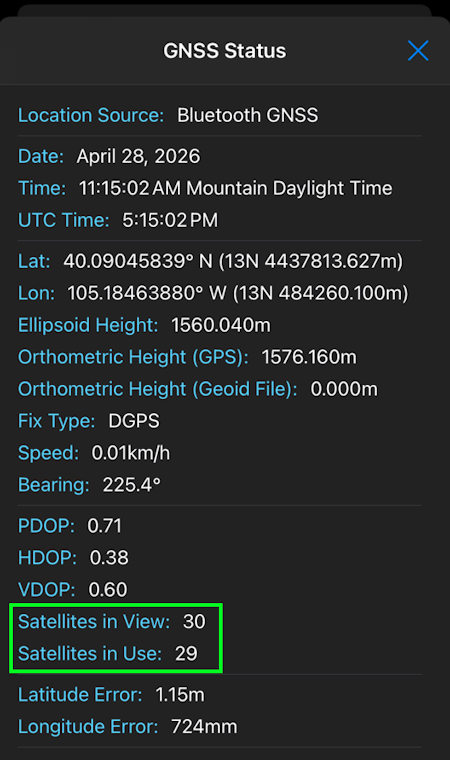
- Now put the device outside with a clear view of the sky. GNSS doesn’t work indoors or near windows. Press the SW Maps icon in the top left corner of the home screen and select GNSS Status. Within about 30 seconds you should see 10 or more satellites in view (SIV) (see above). More SIV is better. We regularly see 30 or more SIV. The horizontal positional accuracy (HPA) will start at around 10 meters and begin to decrease. The lower the HPA the more accurate your position. This accuracy should be below 1m in normal mode.
You can now use your FPL to measure points with meter accuracy. If you need extreme accuracy (down to 8mm) continue reading the Corrections section.
Corrections
To get millimeter accuracy we need to provide the FPL with correction values. See Corrections Sources for a breakdown of the options and the pros and cons of each. For this quickstart, we'll be showing how to use PointPerfect Flex for $15 a month.
Getting Access
PointPerfect Flex over NTRIP requires a set of user name, password, and mount point credentials. Please register here to setup a monthly subscription. Most device purchases come with a trial month if you want to try it out.
An NTRIP Client is a small app that connects to the corrections server to get the corrections. Most GIS apps have an NTRIP Client built in.
NTRIP Client
The easiest way is to use the service is with a cell phone. For this example, we'll use a phone with SW Maps but any GIS app with a built-in NTRIP Client (most do) can connect to PointPerfect.
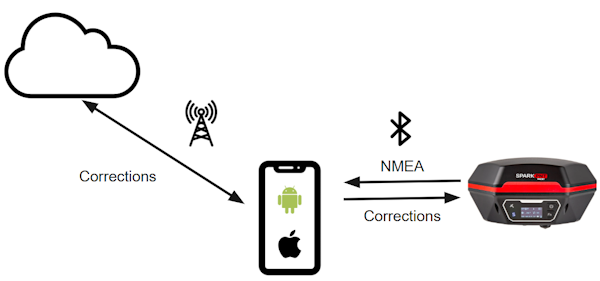
In the above image, the phone is running the NTRIP Client and the corrections are downloaded from the internet using the phone's cellular connection. Those connections are sent over Bluetooth to the FPL. The FPL gets a high-precision solution and transmits the GPS location back to the phone over Bluetooth. The phone displays the location in an app allowing work to be done.
Above, in SW Maps select the NTRIP Client. This is the small cloud icon.
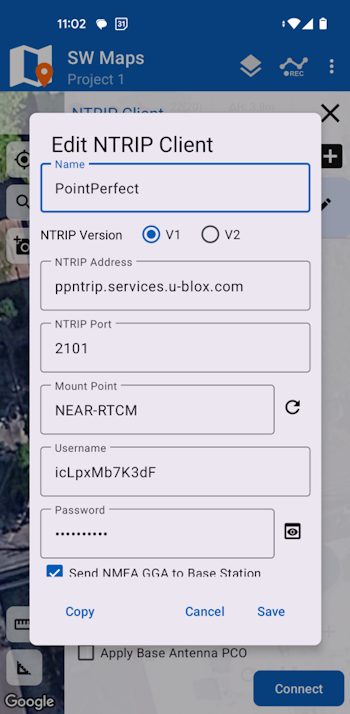
In the NTRIP Client detail window, enter the following information:
- NTRIP Version: V1
- NTRIP Server: ppntrip.services.u-blox.com
- NTRIP Port: 2101
- Mount Point: NEAR-RTCM
- Username: (provided when service was set up)
- Password: (provided when service was set up)
- Send NMEA GGA to Base Station: Please confirm this option is checked
The information can be copy/pasted from email or manually entered. Be careful to enter the data correctly. Once the credentials are entered, click Save and then Exit the NTRIP Client details window.
Next, if the GNSS receiver is not already connected, turn on the FPL and connect to it over Bluetooth by clicking on the receiver button (shown above).
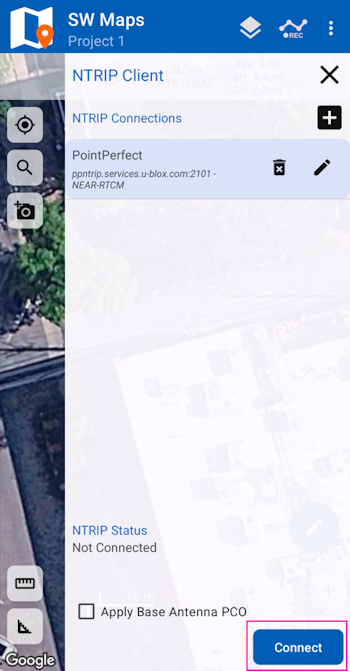
Once the receiver is connected, tap the NTRIP Client (cloud) icon again to open the menu. A list of clients will be shown, select the one you just entered and click 'Connect'.
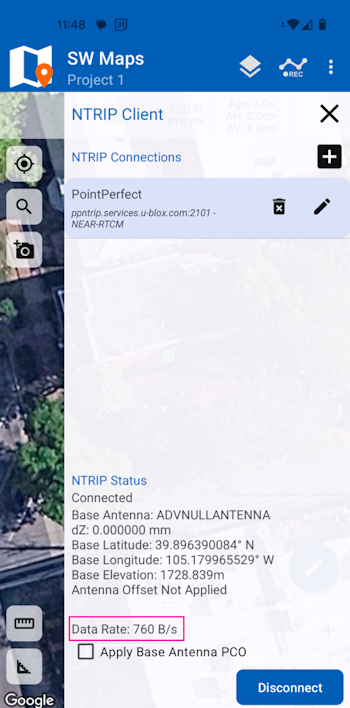
Confirm that the Data Rate section shows more than 0 bytes per second over a few seconds. The number will bounce around, but every second a few hundred bytes of correction data should be downloaded and sent to the FPL over Bluetooth. This indicates the NTRIP connection was successful.
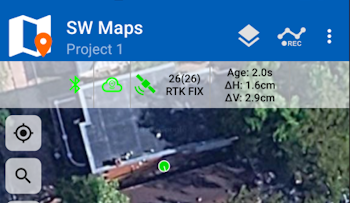
Close the NTRIP Client window returning to the main app screen and proceed outdoors and get a clear view of the sky. Above we see a successful high-precision RTK Fix with 16mm horizontal accuracy. Now you can proceed with GIS work.

Above, if you get a 'Connection Failed' error it is likely that username or password was incorrect. Double check you credentials and try again.
Remote Work
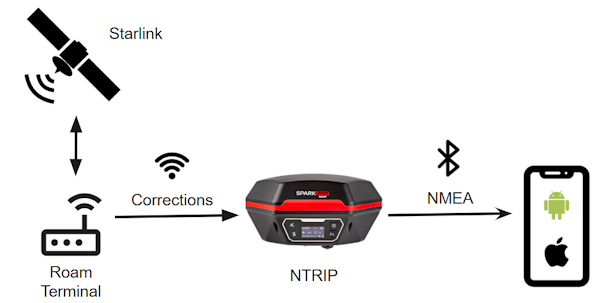
What if you don't have cellular connectivity? Corrections can be obtained over any internet connection. Starlink Roam or Eutelsat KONNECT can provide internet over satellite. Once WiFi is available at the job site the FPL can be configured to connect to WiFi and get the corrections over its built-in NTRIP Client. See the NTRIP Client docs for more information.
Common Gotchas
-
High-precision GNSS works best with a clear view of the sky; it does not work indoors or near a window. GNSS performance is generally not affected by clouds or storms. Trees and buildings can degrade performance but usually only in very thick canopies or very near tall building walls. GNSS reception is very possible in dense urban centers with skyscrapers but high-precision RTK may be impossible.
-
The location reported by the FPL is the location of the antenna element; it's not the location of the pointy end of the stick. Lat and Long are fairly easy to obtain but if you're capturing altitude be sure to do additional reading on ARPs (antenna reference points) and how to account for the antenna height in your data collection software. The FPL's APC is 58.3mm. More information on the APC is here.
noteThis rule does not apply when tilt compensation is activated. See the Tilt Compensation for more information.
-
An internet connection is required for most types of RTK. RTCM corrections can be transmitted over other types of connections (such as serial telemetry radios). See Correction Transport for more details.