Software Overview
We have intentionally kept the ESP32 firmware as simple as possible - supporting only two modes: Ethernet (Mode: 1) and WiFi (Mode: 2). The intention is that you can easily develop your own firmware for the SXM-E using the Espressif ESP IDF if the SparkFun firmware does not meet your needs.
You can of course modify the hardware too, should you want to. The design is completely open-source.
- The ESP32 firmware we provide is only compatible with basic
SSIDandPasswordWiFi authentication. - The firmware is not compatible with networks that implement other provisioning methods such as a captive portal, a QR code, or Wi-Fi protected setup.
mosaic-X5
Beginning with firmware v4.15.0+, Septentrio has introduced a mandatory user login requirement to comply with the EU Radio Equipment Directive (RED) 2014/53/EU, specifically Article 3(3) (d), (e) and (f) regulations. This update has been gradually applied to all receivers leaving production (beginning August 1, 2025). For more details, please refer to the following articles:
RxTools Software Suite
Even if you aren't necessarily interested in it, we highly recommend that users install the RXTools software suite before plugging in their board. For Windows PCs, it also includes the USB driver for the module that enables the Ethernet-over-USB support and virtual COM ports.
Users should install the RXTools software suite on their computer to interact with the mosaic-X5 module through the USB interface. The software package includes the USB-IP driver1 necessary to recognize the board as an ethernet device on Windows PCs. For Linux systems, the standard Linux CDC-ACM driver is suitable.
The following system requirements and installation instructions are from the RxTools v22.1.0 user manual. This information may change in later iterations of the software suite. Please refer to the user manual (of the version you are utilizing) for the most accurate information.
System Requirements
Operating Systems
- Windows 7
- Windows 8
- Windows 10
- Fedora 23 (or later) using Qt technology.
- The standalone tools (except
bin2asc) will run on older distributions.
Hardware
- CPU: 1 GHz processor
- RAM: 1 GB RAM
- Screen Resolution: 1024×768 or higher resolution
The minimal hardware requirements for a 1Hz update2
Installation Instructions
- Windows
- Linux
Users can install RxTools software suite by running the installation executable3, located in the RxTools\windows directory of the downloaded *.zip file4. During the installation process, users will be notified if a previous version of RxTools is already installed then the previous version will be uninstalled. Next, users will need to provide an installation directory for the RxTools software suite. Users will then select which of the following applications5 are installed:
For RxTools v22.1.0, the filename of the installation executable is RxTools_22_1_0_Installer.exe.
Once installed, the following applications will be available:
- RxControl
- SBF Converter
- SBF Analyzer
- RxLogger
- RxUpgrade
- RxDownload
- RxPlanner
- Data Link
- RxAssistant
- RxLauncher
It is recommended that users NOT install RxControl as root, for security reasons and to avoid installation overwrites of other system settings. To make RxTools available to more than one user, provide a shared installation directory.
Users can install RxTools software suite by running the installation binary3, located in the RxTools/linux-i386/ directory of the downloaded *.zip file4. During the installation, users will be prompted for an installation directory. If there are any previous installations of RxControl, please use a different directory to avoid conflicts.
For RxTools v22.1.0, the filename of the installation binary is RxTools_22_1_0_Installer.bin.
In order to run the RxTools on a 64-bit Linux operating system, users might have to install the 32-bit version of the C standard library.
- For Fedora installations, this is the
glibc.i686package. - The equivalent for Debian(/Ubuntu) installations is the
ia32-libspackage.
Permission Settings - Serial Ports
Once installed, users may need to reconfigure their permission settings:
-
RxTools will need permision to access the
/dev/ttyS*serial ports.-
To access the serial ports, users must be part of the
uucpandlockgroups6. This can be configured by editing the/etc/group7 file and adding the username to the lines defining theuucpgroup and thelockgroup.For example, when adding the user
jsmithto theuucpgroup, users would modify the/etc/groupfile as shown below:Modify this lineuucp:x:14:uucpUsername addeduucp:x:14:uucp,jsmith -
On Linux machine administered centrally on a local network, ask your system administrator to be included in the
uucpandlockgroups.
-
-
RxTools also needs read/write (
rw) access8 to the/dev/ttyS*serial ports.-
Users can change the permissions with the
chmod9 command, where<add port>is the specify the port number (i.e./dev/ttyS0might be theCOM1port):chmod 660 /dev/ttyS<add port>
-
In order for these changes to take effect, users must update their environment by logging out and back in.
Be aware that the X-session has to be restarted as well. On most systems, this can be done by pressing the key combination Ctrl + Alt + ⬅ Backspace
USB Driver
- Windows
- Linux
If users haven't already installed the RxTools software suite on their Windows PC, they will need to install the USB driver1 necessary to recognize and interact with the mosaic-X5 module through the USB interface.
A Windows USB driver for the mosaic-X5 can be installed through two methods:
- RxTools Software Suite
- The driver is installed during the installation process.
- mosaic-X5 GNSS Receiver Module
- The installation file for the Windows USB driver will be available from the mass-storage device when the board is initially connected to the computer.
Once installed, the driver emulates two virtual serial ports, which can be accessed as standard COM ports to the receiver.
For users who are having trouble locating the USB driver, we have archived a copy of the installation file. Users can download the archived copy10, by clicking on the button below.
On Linux, the standard Linux CDC-ACM driver is suitable for the mosaic-X5 module.
Most terminal emulation programs will not make a distinction between virtual or native COM ports. However, for virtual serial ports, the port settings (i.e. baud rate, etc.) are not relevant and the default configuration is used in the terminal emulation program. However, the physical/native COM ports will have the following default setting:
- Baudrate: 115200bps
- Data Bits: 8
- Parity: No
- Stop Bits: 1
- Flow Control: None
Web Interface
With the USB driver installed, the mosaic-X5 module supports Ethernet-over-USB. The default IP address allocated for the Ethernet-over-USB interface is 192.168.3.1. This IP can be entered in any browser to open a connection to the receiver's Web Interface as shown below.
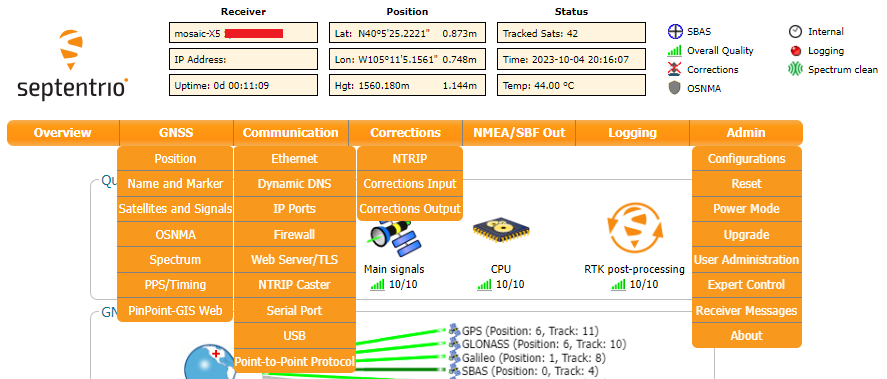
The default IP address cannot be changed; this feature is only to be used when a single receiver is connected to your computer.
One of the documentation pages on Septentrio's website, specifies a default IP address of 192.168.20.1 for the web interface. However, that address is for a WiFi enabled product and cannot be used with this product.
Firmware Update
For the latest firmware, please check Septentrio's product page for the mosaic-X5 module. The button below, will redirect users to the resources on the mosaic-X5 product page.
GPS Data
Besides logging data with just the LOG button, users can configure/enable the output of data streams through the COM ports and data logging to the SD card through the web interface or RxTools software suite. The videos below illustrate how these features can be operated through the web interface.
Related Video
While this instructional video is for a different product line, the information, for the most part, is still relevant.
Sharing Internet Access
By default, the mosaic-X5 GNSS receiver is not configured to access the internet through the USB interface. In order to receive or cast RTK corrections to/from a RTK network, such as NTRIP, users will need to enable capability.
- Users will need to use the web interface or RxTool software suite to enable the
Outgoing Internet Access Over USBfrom the Communication > USB drop-down menu of the navigation tabs. - This also requires users to allowing Internet sharing through on their computer as well. The procedure to do so depends on your operating system.
- On a Windows PC, users must enable
Allow other network users to connect through this computer's Internet connection, through the properties option of the network adapter with internet access. - On a Linux computer, users will likely need to configure a network bridge.
- On a Windows PC, users must enable
Once a network bridge is enabled, the receiver will receive its IP address from the computer's DHCP server. Depending on the routing table, the module may no longer be reachable at its default IP address (192.168.3.1).
More Videos
Users can find other instructional videos on Septentrio's YouTube Channel. Feel free to check out their playlists as well:
Other Videos
ESP32
USB Driver
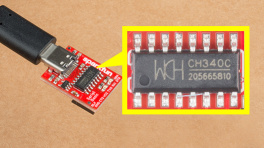
Users will need to install a USB driver for the CH340 serial-to-USB chip, in order to communicate with the ESP32 module. The latest USB drivers for the CH340 are available from the manufacturer, on the WCH website:
For users having trouble installing the CH340 USB driver, check out our video and hookup guide:
How to Install CH340 Drivers
Terminal Emulator
In order to configure the WiFi settings on the ESP32, users will need to install a serial terminal emulator on their computer.
- Windows
- Linux
For Windows computers, we highly recommend TeraTerm.
Some Linux operating systems will already have the screen terminal emulator preinstalled.
Serial Terminal Basics
Check out our hookup guide on how to install your favorite terminal emulator.
WiFi Credentials for the Network Bridge
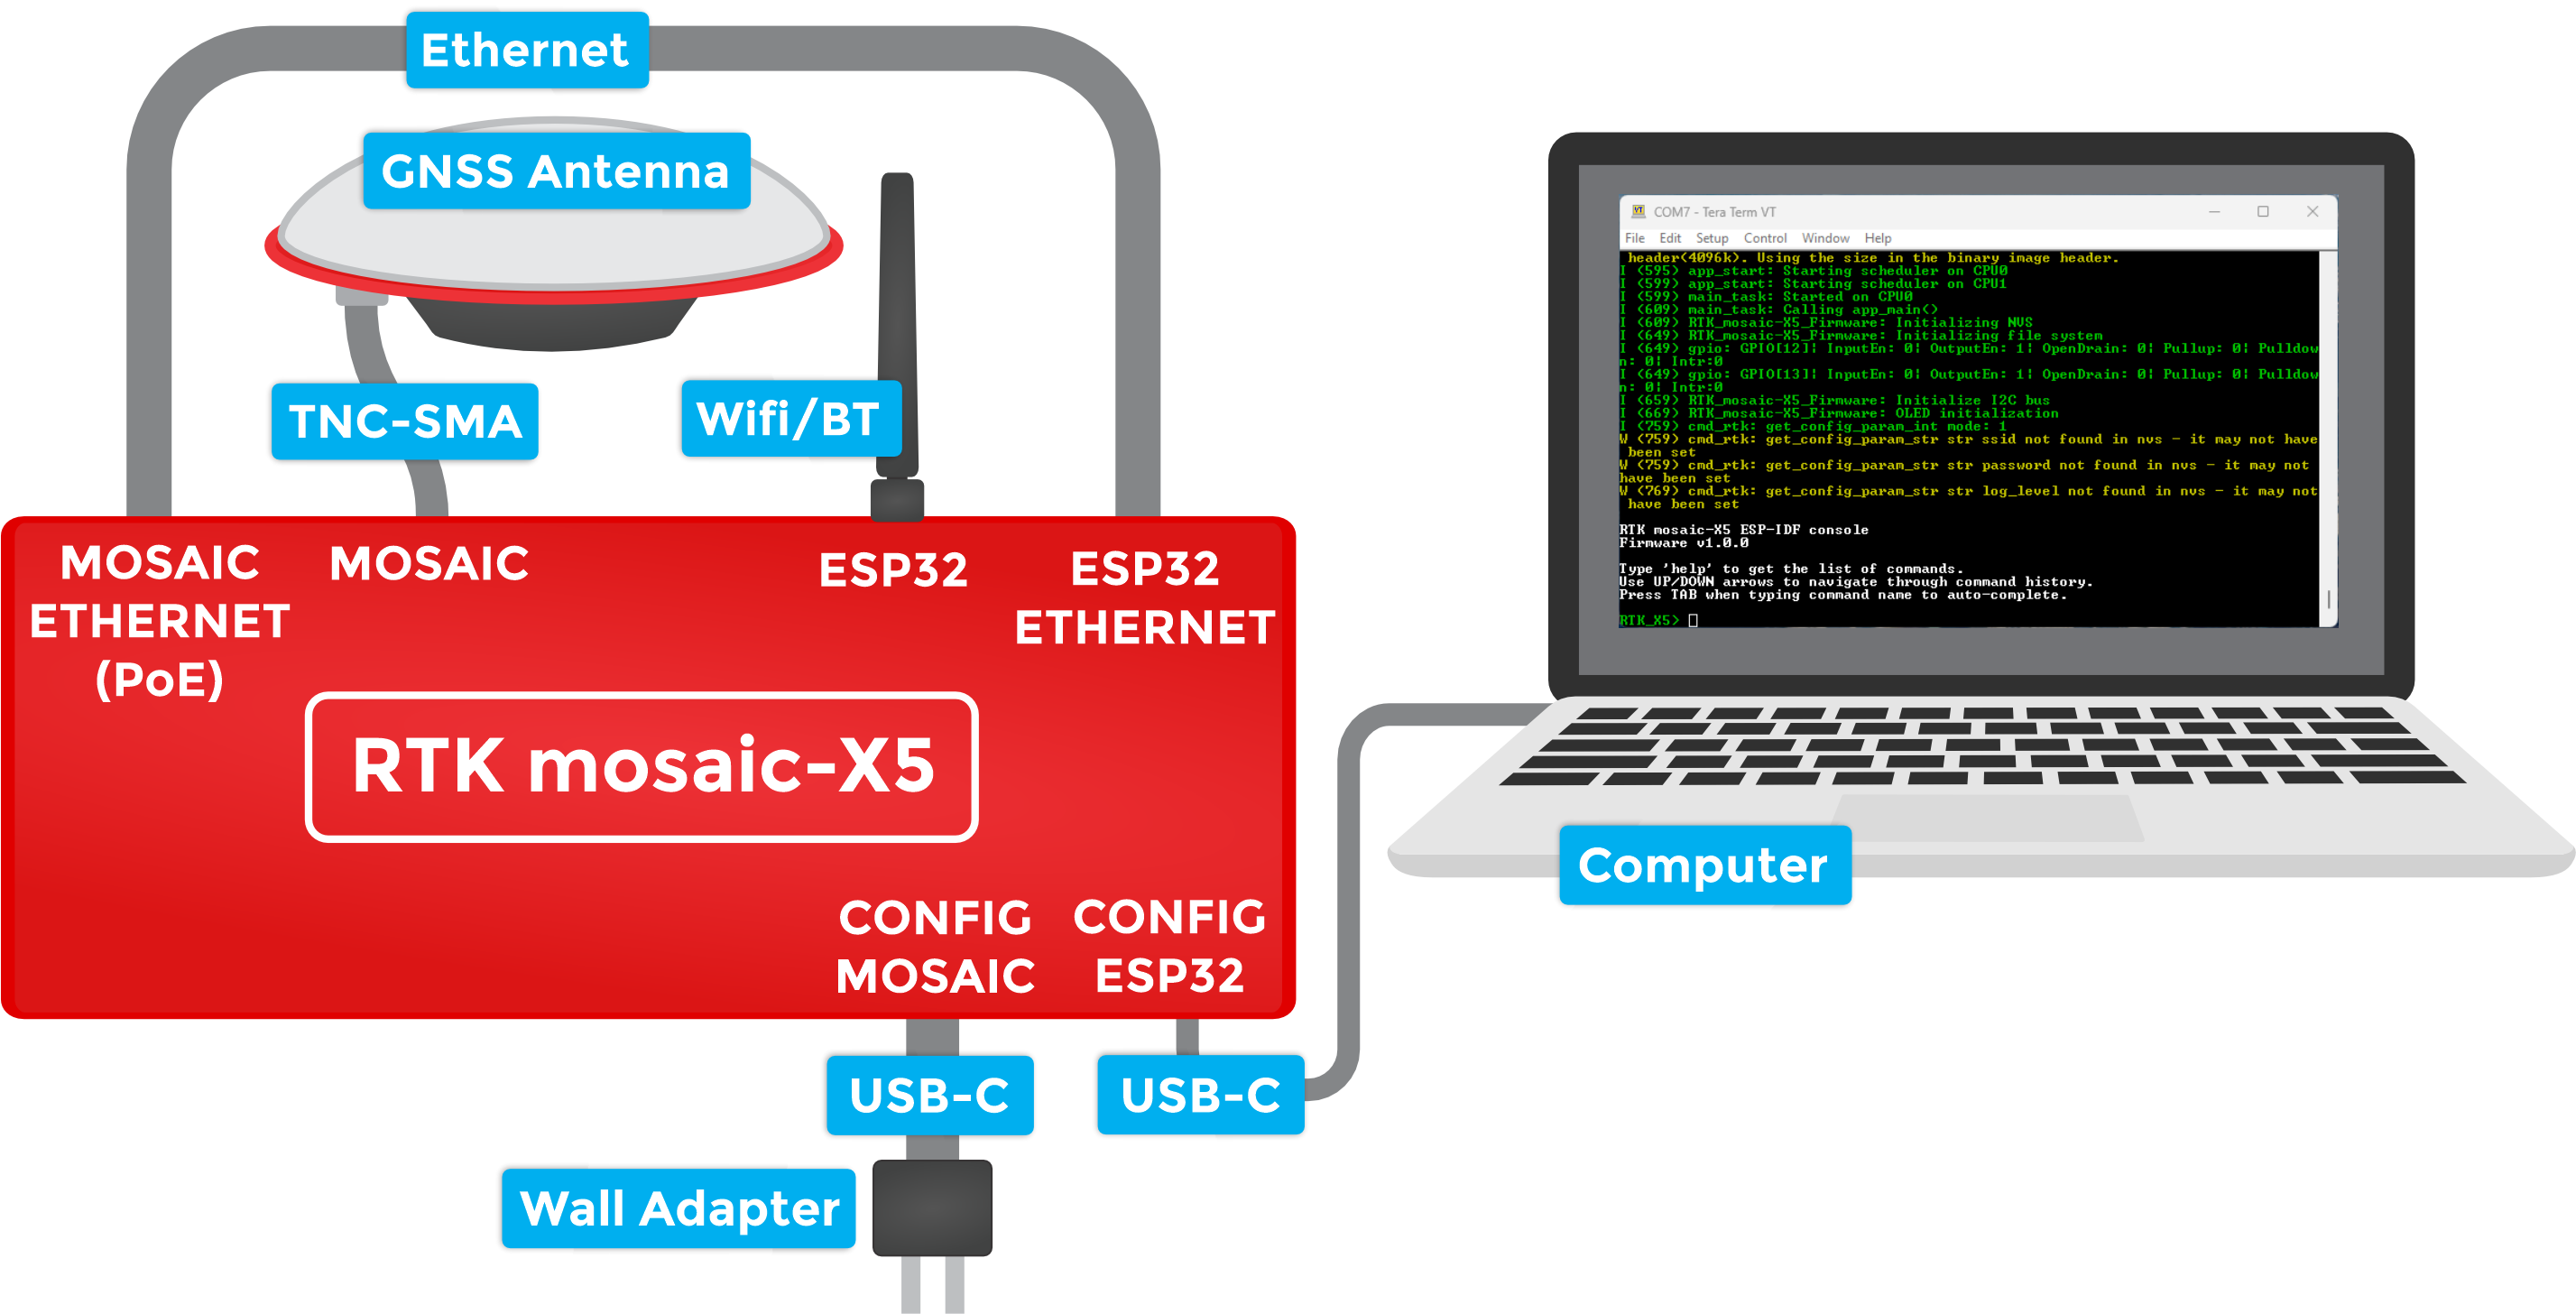
With the CH340 USB driver and a terminal emulator installed, users will now be able to configure the WiFi credentials on the ESP32. In order for the firmware to operate properly, users should have their SXM-E assembled with the network bridge in WiFi Mode.
1 - Open a Serial Terminal
- Open the connection to the CH340 using a baud rate of 115200bps
2 - Put the ESP32 firmware into WiFi mode
-
When you have the Serial Terminal open, you should see the
RTK_X5>console prompt. If you do not, hit Enter on your keyboard. If needed, click the RESET button on the front of the SXM-E to restart the ESP32 firmware.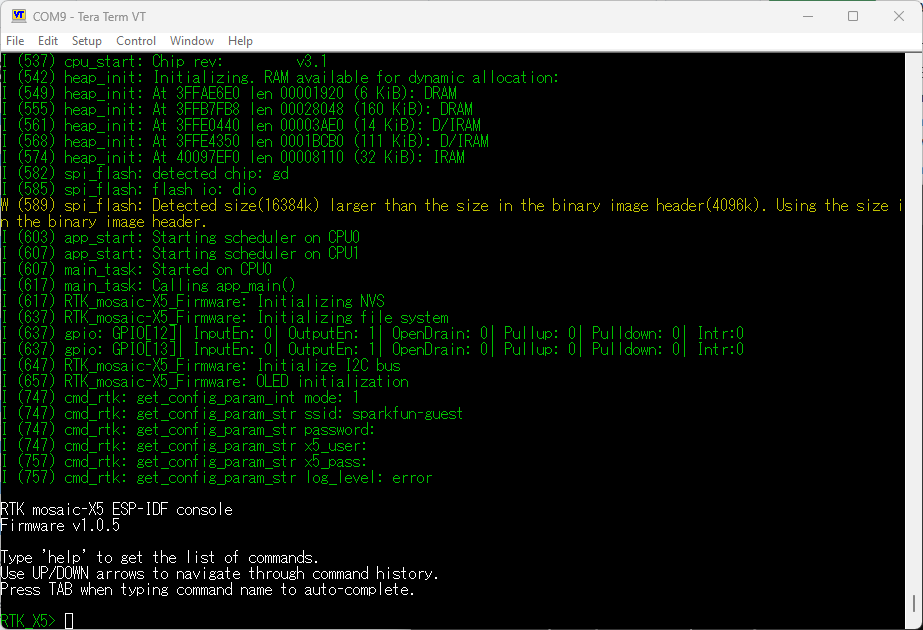
RTK_X5>in the console prompt -
Type
helpand hit enter to see the help.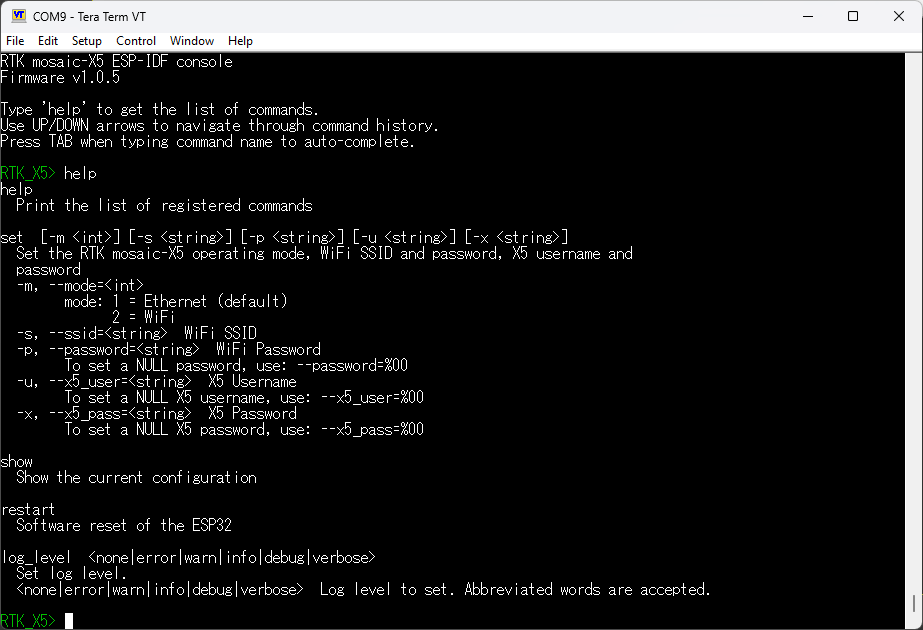
Output from helpcommand -
Type
showto see the current configuration.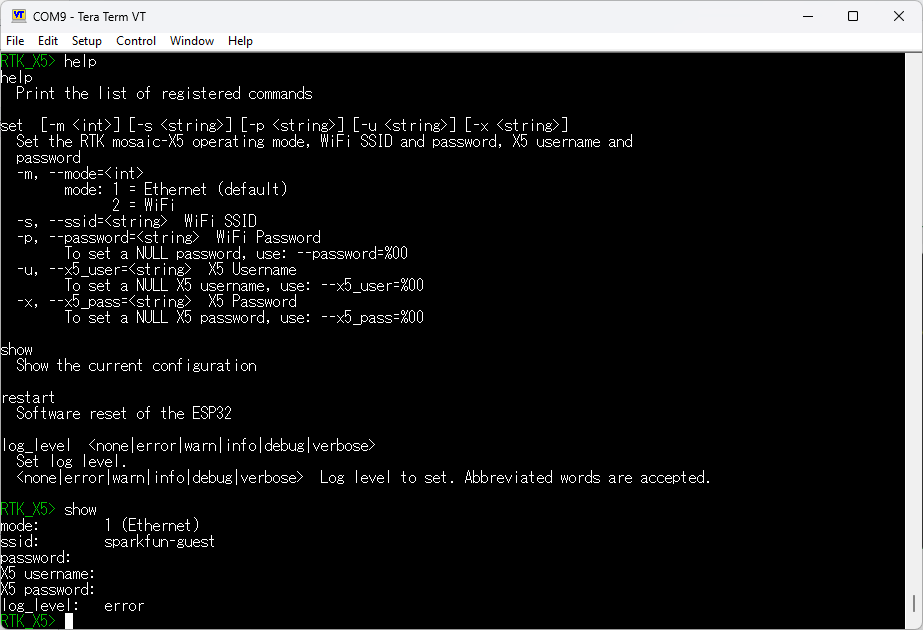
Output from showcommand -
By default the firmware will be in Mode:
1(Ethernet). To change the mode to Mode:2(WiFi), we type:set -m 2Long ArgumentsThe console supports both short and long args, so we could type:
set --mode=2 -
To set the WiFi SSID, type one of:
set -s YOUR_SSIDset --ssid=YOUR_SSID- Likewise, to set the WiFi password, type one of:
set -p YOUR_PASSWORDset --password=YOUR_PASSWORD
- To save time, you can set all three together with one of:
set -m 2 -s YOUR_SSID -p YOUR_PASSWORDset --mode=2 --ssid=YOUR_SSID --password=YOUR_PASSWORD
- Likewise, to set the WiFi password, type one of:
-
Finally, type
restartto restart the firmware with the new settings:restartNULL (empty) passwordTo clear the password - making it NULL / empty - type one of:
set -p %00set --password=%00
Once the mosaic-X5 has acquired a satellite signal and is connected to the WiFi network, the OLED will display the antenna's position as Latitude (Lat), Longitude (Long) and Altitude (Alt); the WiFi IP (Internet Protocol) network address. The firmware mode, SSID and password are stored in flash (non-volatile) memory. After changing them, you can disconnect the computer and power the SXM-E using the supplied wall adapter.
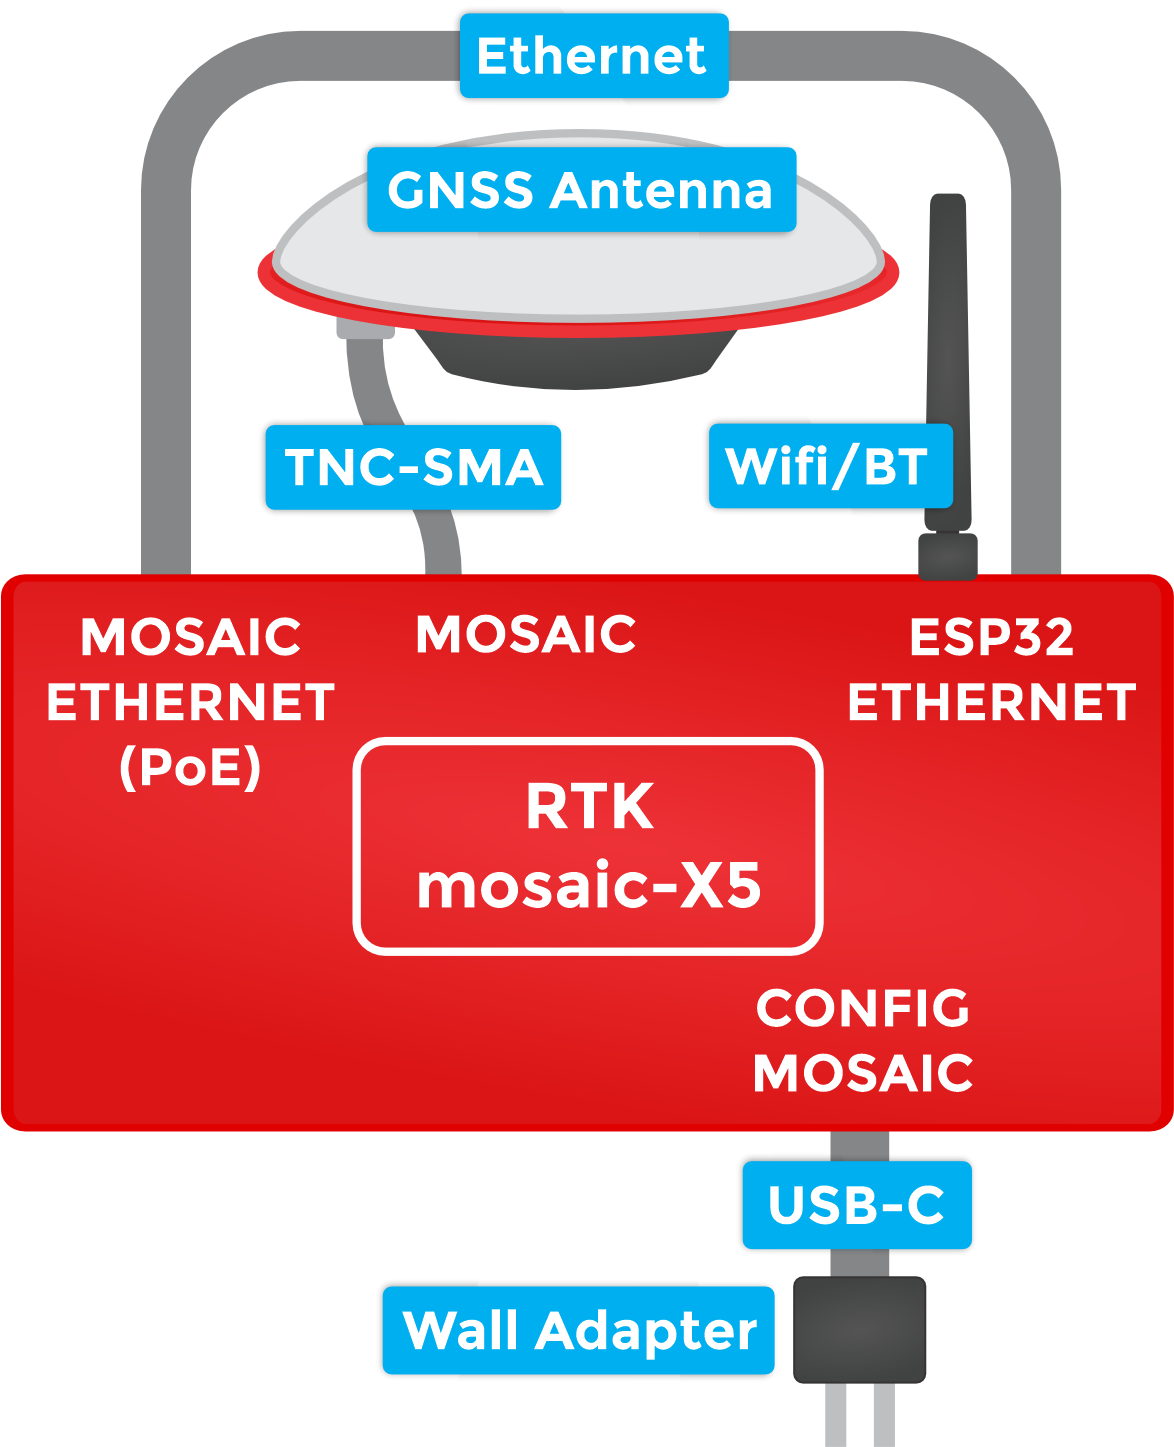
When powering the SXM-E on for the first time, you may see the firmware restart (reboot) several times while it waits for the mosaic-X5 to initialize. This is not an error or anything to be concerned about.
With the SXM-E operating with the configured WiFi network bridge, users should be able to open a web browser on any connected device and navigate to the IP address shown on the OLED display. The browser should be able to access the mosaic-X5's internal web page, where users can configure the mosaic-X5.
ESP32 Firmware - Update
The firmware running on the ESP32 is based heavily on the firmware for the Septentrio mowi. SparkFun added some bells and whistles, primarily to support the OLED display. The full firmware source code is available in the GitHub repo. It was developed and compiled with the Espressif ESP-IDF version 5.1.5.
The most recent version of the firmware is v1.0.5, released on April 22nd 2026. If you purchased your SXM-E before this date, you may enjoy the improvements in v1.0.5:
Changes added at v1.0.5:
- The firmware now supports a username and password for the X5 itself
- This is to support mosaic-X5 firmware versions >= 4.15.1 where a username and password are mandatory on IP interfaces (webUI, Ethernet-over-USB, CLI over TCP/IP)
- The username and password are not mandatory on COM and USB (virtual COM) ports, unless you set the
Default Access Level Per Interface(setDefaultAccessLevel/sdal) to none for COM and/or USB ports - The ESP32 firmware only needs to know the username and password if the default access levels have been changed
- For more information about the X5 Log-in procedure, please read this Septentrio documentation
- If you upgrade the X5 firmware to 4.15.1:
- Enter your user-defined username and password, using the Factory credentials RxAdmin and S3pt3ntr10, as described in the Log-in procedure
- You will need to enter the user-defined username and password whenever you connect over an IP interface
- Logging in via the ESP32 on a COM port does not remove the need to log in on IP interfaces. You still need to log in on each IP interface individually and separately
- Upgrade the ESP32 Firmware to v1.0.5, following the procedure described below
- If the ESP32 needs to know the username and password: in the ESP32 Serial Terminal / console, use option set -u to set the X5 username and option set -x to set the X5 password
- Turn the SXM-E off and back on again
Changes added at v1.0.4:
- The firmware now includes an efficient SBF and NMEA parser
- Previously the NMEA GPGGA and SBF IPStatus messages were polled, this resulted in the OLED being updated once every ~2 seconds
- In v1.0.4: NMEA Stream10 carries the GPGGA message at 1Hz; SBF Stream10 carries the IPStatus message OnChange
- The OLED is now updated on the arrival of the GPGGA message, at exactly 1Hz
- The firmware now ensures that the SBF and NMEA protocols are enabled for output on X5 COM4
- Previously, the firmware would stall if either SBF or NMEA were disabled
- The firmware now supports the NMEA GN Talker ID, in addition to GP
- Previously setting the Talker ID to GN would cause the firmware to stall
- The OLED now displays the Latitude and Longitude in DD MM SS.SSSS format, to match the format of the X5's internal web page
- Previously the format was DDMM.MMMMMM, copied directly from the GPGGA message
- The firmware will perform a soft reset of the GNSS during startup - if needed
- The X5 can go into a Ready for SUF download state if it is reset four times with no antenna connected
- This can be cleared with a soft reset
To upgrade the ESP32 firmware, using a Windows PC:
- Download the complete SXM-E repo as a Zip file:
- Alternatively, download the latest or a previous release (Source code zip) from the repo releases page
- Unzip the Zip file (Extract All)
- Open a Command Prompt and navigate into the Firmware sub-folder
- Connect the SXM-E
CONFIG ESP32port to your PC using a USB-C cable- It should appear in Device Manager as a CH340 COM port
- Run ESP32_FLASH_ERASE.bat to completely clear the ESP32 memory
- The .bat file should find the COM port number for you
- If you see the error
'wmic' is not recognized as an internal or external command, operable program or batch file, you will need to install WMIC or provide the COM port manually:
ESP32_FLASH_ERASE.bat COM1
- If you need to run
esptoolmanually, use the following replacing COM1 with your COM port:
esptool.exe --chip esp32 -p COM1 -b 460800 erase_flash
- Then run ESP32_FLASHER.bat to upload the firmware
- The .bat file should find the COM port number for you
- If you see the error
'wmic' is not recognized as an internal or external command, operable program or batch file, you will need to install WMIC or provide the COM port manually:
ESP32_FLASHER.bat COM1
- If you need to run
esptoolmanually, use:
esptool.exe --chip esp32 -p COM1 -b 460800 --before=default_reset --after=hard_reset write_flash --flash_mode dio --flash_freq 40m --flash_size 4MB 0x1000 RTK_mosaic-X5_Firmware\build\bootloader\bootloader.bin 0x10000 RTK_mosaic-X5_Firmware\build\RTK_mosaic-X5_Firmware.bin 0x8000 RTK_mosaic-X5_Firmware\build\partition_table\partition-table.bin
On Linux / MacOS, you can pip install esptool and then run the above commnds, replacing esptool.exe with esptool
ESP32 Firmware - Compiling from source
This is information about how to compile the SXM-E firmware from source. This is for advanced users who would like to modify the functionality of this RTK product.
How SparkFun does it
At SparkFun, we use GitHub Actions and a Workflow to compile each release of the SXM-E firmware. We run the build-for-release workflow directly on GitHub. A virtual ubuntu machine installs the Espressif IDF and generates the firmware binary for the ESP32. The updated firmware, bootloader and partition-table .bin files are pushed to the repo. We then create the new release manually.
You are welcome to clone or fork this repo and do the exact same thing yourself. But you may need a paid GitHub Pro account to run the GitHub Actions, especially if you keep your clone / fork private.
The non-release-build workflow builds the firmware binaries and attaches them as an Artifact to the workflow run. Navigate to Actions \ Non-Release Build, select the latest run of Non-Release Build, the binary files are in the Artifact. This may be useful if you want to build the firmware on GitHub but don't want the changes pushed to your repo.
You can then use (e.g.) ESP32_FLASHER.bat to upload the binary onto the ESP32.
Using Docker
Here is a step-by-step guide for how to install Docker and compile the firmware locally from scratch:
Clone, fork or download the repo
To build the SXM-E firmware, you obviously need a copy of the source code.
If you are familiar with Git and GitHub Desktop, you can clone the SXM-E repo directly into GitHub Desktop:
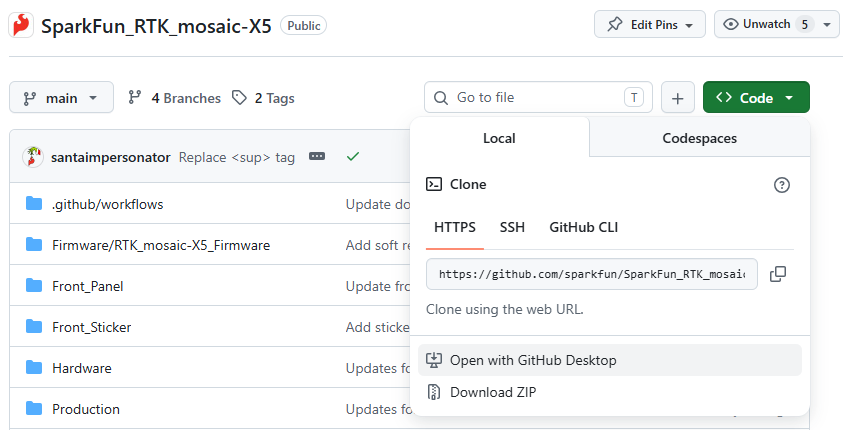
If you want to contribute to RTK Everywhere, and already have a GitHub account, you can Fork the repo:

Clone your fork to your local machine, make changes, and send us a Pull Request. This is exactly what the SparkFun Team do when developing the code. Please use the release_candidate branch for any such changes. We are very unlikely to merge anything directly into main, unless it is (e.g.) docs corrections or improvements.
If you don't want to do either of those, you can simply Download a Zip copy of the repo instead. You will receive a complete copy as a Zip file. You can do this from the green Code button, or click on the icon below to download a copy of the main (released) branch:
For the real Wild West experience, you can also download a copy of the release_candidate code branch. This is where the team is actively changing and testing the code, before it becomes a full release. The code there will usually compile and will usually work, but we don't guarantee it! We may be part way through implementing some breaking changes at the time of your download...
Install Docker Desktop
- (Optional) Head to Docker and create an account. A free "Personal" account will cover occasional compilations of the firmware
- Download and install Docker Desktop - there are versions for Mac, Windows and Linux. You may need to restart to complete the installation.
- Run the Desktop
- You don't need to have an account and you don't need to be signed in
- You only need to be signed in if you want to store or share your Container on Docker Hub
- If you don't sign in, Docker Desktop will run in Personal mode - which will cover local compilations of the firmware
- On Windows, you may see an error saying "WSL needs updating Your version of Windows Subsystem for Linux (WSL) is too old". If you do:
- Open a command prompt
- Type
wsl --updateto update WSL. At the time of writing, this installs Windows Subsystem for Linux 2.6.1 - Restart the Docker Desktop
- If you are using Docker for the first time, the "What is a container?" and "How do I run a container?" demos are useful - but not essential
- On Windows, you may want to give Docker Desktop permission to access to your Network, so it can access (e.g.) HTML ports
- You can Stop the container and Delete it when you are done
- You may want to prevent Docker from running when your machine starts up
- Uncheck "Start Docker Desktop when you sign in to your computer" in the Desktop settings
Using Docker to create the firmware binary
- Make sure you have Docker Desktop running. You don't need to be signed in, but it needs to be running.
- Open a Command Prompt and
cdinto the SparkFun_RTK_mosaic-X5 folder - Check you are in the right place. Type
dirand hit enter. You should see the following files and folders:
	.gitattributes
	.gitignore
	CONTRIBUTING.md
	ISSUE_TEMPLATE.md
	LICENSE.md
	mkdocs.yml
	README.md
cd Firmwareand thendiragain. You should see:
	RTK_mosaic-X5_Firmware
	compile_run_terminal.bat
	compile_with_docker.bat
	Dockerfile
	ESP32_FLASH_ERASE.bat
	ESP32_FLASHER.bat
	esptool.exe
-
The file that does most of the work is the
Dockerfile -
Run
compile_with_docker.bat. It does everything for you:
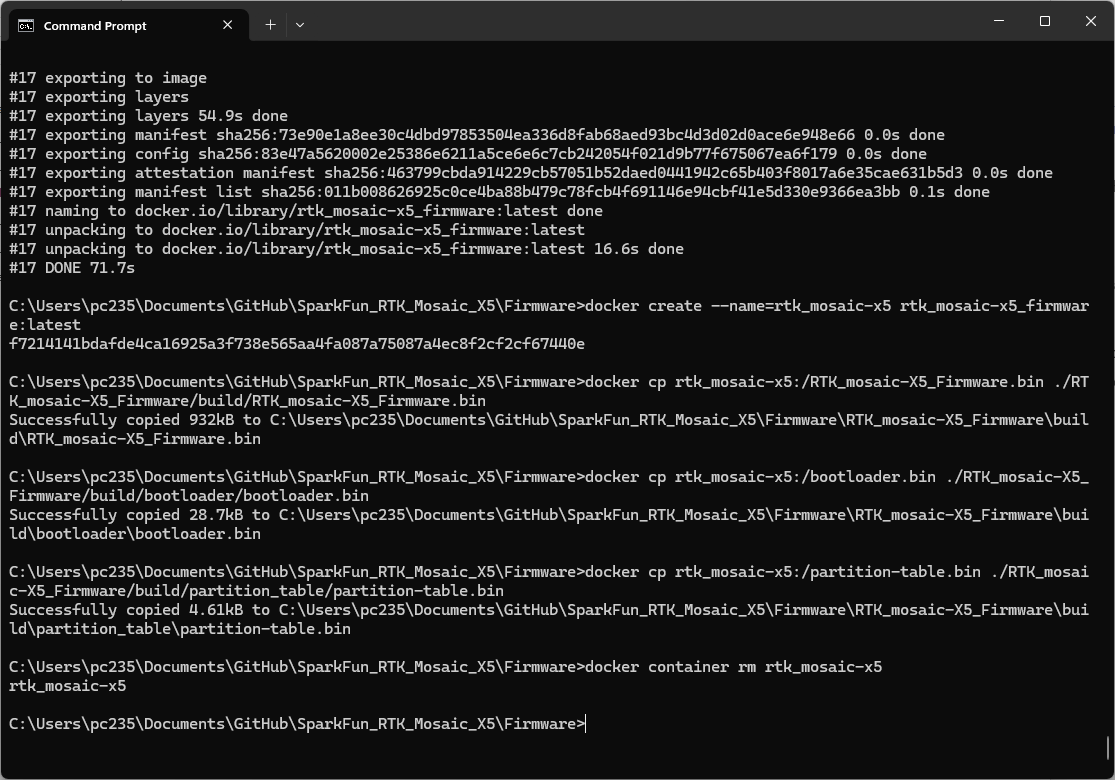
- Hey presto! You have your newly compiled firmware binary!
- The three new files are:
- RTK_mosaic-X5_Firmware\build\RTK_mosaic-X5_Firmware.bin
- RTK_mosaic-X5_Firmware\build\bootloader\bootloader.bin
- RTK_mosaic-X5_Firmware\build\partition_table\partition-table.bin
You can then use (e.g.) ESP32_FLASHER.bat to upload the binary onto the ESP32.